|
Great work as usual my friend!
The following user(s) Liked this: silvertriple
|
|
|
Please Log in to join the conversation. |
|
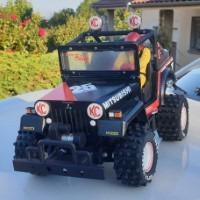
Electronics is done...
A few settings were required for the direction as the angle is very limited... I'll probably won't have the time to print tires for this car, but I may used some Scorpion rear with the original rims (I have a set of rims and a friend just tried that as I was mentioning they may work well together with Scorpion re-release tires). I have some on order, and they should arrived within the week. Beside this I still have to print a Bumper (I have one printed in ABS, but i'm not sure it will work nicely. I may want to try TPU instead. TPU is a nightmare for supports, but printed splitted and glued that should not be an issue. The real question is how to make the bumper rigid enough so it does some work... Anyway, I'll find a solution and this car will run (until a break a PETG printed part) next week I buy kits to built and ru(i)n them
The following user(s) Liked this: caprinut
|
|
Please Log in to join the conversation. |

|
I've designed a support for the driver figure. It works with a Samurai driver, but could ultimately work with anything with a bit of modifications...
It's currently printing, and it will require 2 minutes effort to put it in place at the end... ABS bumper is in place, and I'm thinking than maybe a mixed part with TPU and ABS halves could do the job... I buy kits to built and ru(i)n them
|
|
Please Log in to join the conversation. |
|
While I have some Scorpion re-re rear tires on order (they are shipped, but should arrive on Thursday or Friday), I did found a set of two in my stuff...
I put it on the set of rims I have without tires... The internal ring keeps the tire in place firmly, and since the profile is not exact, it doesn't fit symmetrically on the rim. That said, the front side is a bit rounded, and that will protect the chrome side, while the rear is flat... That should definitely work. I check the dimensions next to original tires, they are slightly larger, but diameter wise this is perfect. And I also found that there was another easy possible solution which should work easily for any 44B car (it would be the same for Zerda by the way)... Only waiting for the tires on order to arrive. The ones I have here may be soft while the other ones are medium, but that should not be an issue : I'll probably put the set of soft at the front while the medium will be at the rear... I buy kits to built and ru(i)n them
|
|
Please Log in to join the conversation. |
|
Tires arrived today and they were promptly mounted on the car as the driver was quite impatient... I probably need to add some preload on the front but beside this not much to adjust...
I also took pictures with the one built like the original, this should make easy comparison between the original tires and the Kyosho Scorpion 2014 rear tires... I buy kits to built and ru(i)n them
The following user(s) Liked this: stingray-63
|
|
Please Log in to join the conversation.
Last edit: by silvertriple.
|
|
Really cute hilux.
|
|
Please Log in to join the conversation. |
|
Beside the Bearcat SS you can see the video in the ad'hoc thred, I ran as well the 44B Hilux with its printed parts, kyosho shocks and tires...
And it is great on the track. Although short, which requires to pay a bit of attention when turning, it's great car and easy to handle. I was really surprised how balanced it is during jumps as it stays flat, which means the balance is near perfect... My son took again a video (which is the assembly of two actually). The noise you can hear is not due to belt skips, but is due to the bodyshell rubbing on the printed bodymounts... I solved this later with some o-joints... I buy kits to built and ru(i)n them
|
|
Please Log in to join the conversation. |
|
I got contacted by someone searching for a Zerda bumper... I never tested it, so printed one in TPU to see...
The dimensions, profile and holes position are perfect, only the cuts profile are not perfect. I may do something about it at some point, but for the time being if any one needs a bumper for a Zerda, you may contact me. I buy kits to built and ru(i)n them
|
|
Please Log in to join the conversation. |
|
While I had a 44B Hilux with quite a few printed parts (FDM) running during the vintage event this season, there is a few things left on my todo list for this project for parts publication :
- put parts in clusters for SLS/MJF nylon prints - review the radio box for 44B-LWB chassis : while doing some supports, I noticed one measure was wrong, and unfortuntaly, the radiobox and the lid will need a major rework - zerda parts testing (mainly the belt cover, which I have a reasonable doubt due to the mistake seen on the 44B LWB chassis, so I want to check it) Beside this, I also have in mind one single picture with a few 44B chassis. I was lucky and found other 44B LWB chassis which should allow me to rebuild a 44B Rock'n Vega, a Lancia 44B, and a 44B Racing Baja : I will have to work out a mold for this bodyshell. The Lancia 44B will rely on Nylon PA12 SLS 3D printed parts, dyed red (I need one of those chassis to show case the prints, although I'm 100% sure they are right for dimensions as I have the FDM version already running). In the meantime, I worked out the clusters for both 44B and Zerda suspension parts. I will need to check if there is enough room in the belt cover to pass a GT2 belt, as if it is the case, I may be very well go for a GT2 puley set printed in nylon... I buy kits to built and ru(i)n them
|
|
Please Log in to join the conversation. |
|
My 44B-LWB chassis plate was 1mm to short... 336 instead of 337. I noticed that when making supports for my 44Bs. The radio box was therefore having a mm issue somewhere...
The fact is : most of my parts relied on that single chassis plate. Move the rear of the chassis plate and all goes with it: dependancies are a nightmare in that case in (con)fusion360. Reworking the radiobox required a review of the rear gearbox side (which I know at 100% sure to be right in initial design). I decided to break the link with the original design of the chassis plate to remove the dependancy to make it easier to work out the radio box. if not, I have to redo the gearbox sides, with all risks of making it incorrect. After a morning debugging, my radio box should be good now. I'll print one in PLA to check it is fine. Next is the radio box lid... I buy kits to built and ru(i)n them
|
|
Please Log in to join the conversation. |

