Keyword
  • Page:
  • 1
  • 2

TOPIC:

Winger help ID 9 months 1 week ago #81709

  • Pants
  • Pants's Avatar Topic Author
  • Offline
  • No Guts No Glory!
  • No Guts No Glory!
  • Posts: 13
  • Likes received: 9
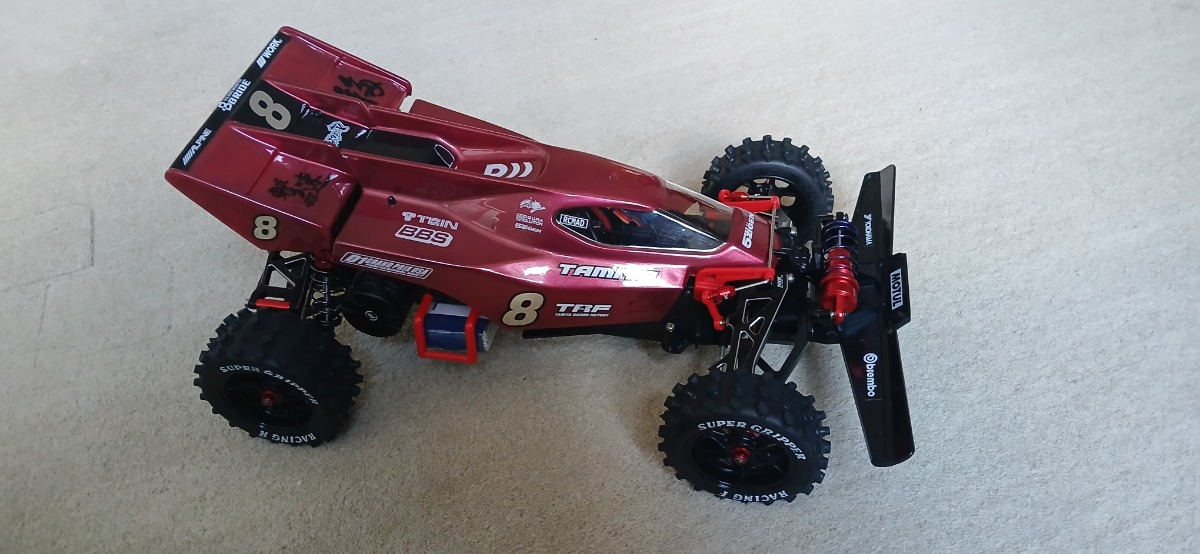
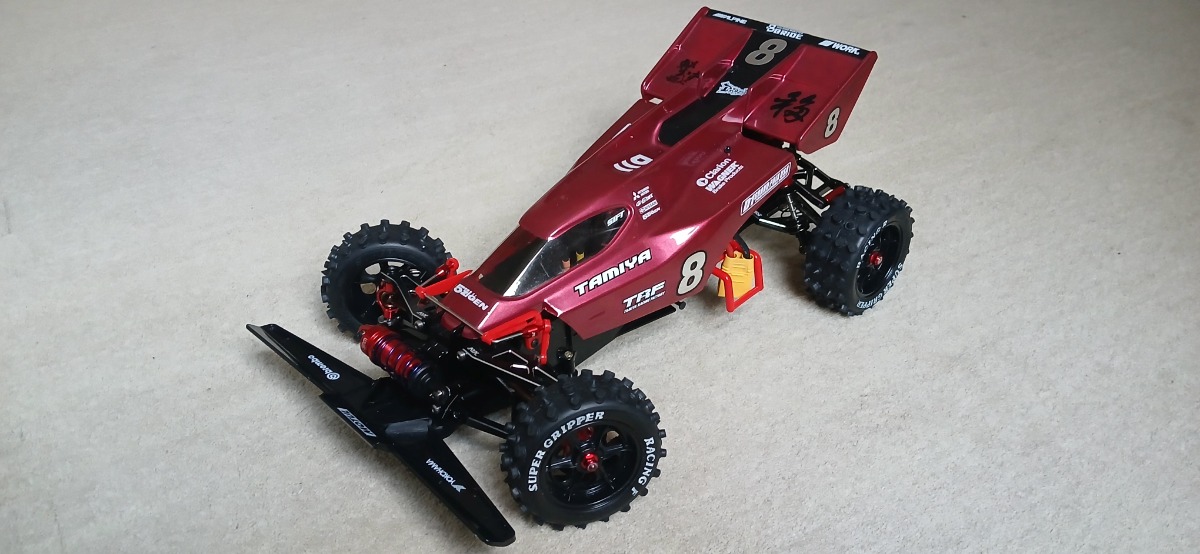
Right, I'm back. As promised, the build:

Background

It started off with me seeing the pic I posted at the beginning of this thread and instantly fell in love with it. As a total (and convenient) coincidence, I had an original 1987 built (not by me) Boomerang collecting dust in my attic that was given to me over 30 years ago by a friend. It was a sign, and its fate was sealed. I originally intended to rebuild this at minimal cost, with the main focus of just replicating the picture of the Winger I originally posted. The only thing I would have upgraded (other that the items required to get to look like the pic) was to replace the original speed controller with an electronic one. But then Google Images and PayPal existed, OCD kicked in and the rest is history. Technically as the original car was gifted to me, and therefore zero cost, the original build should have cost in the order of £100 - £200 which would have covered wheels, tyres (old ones had cracked with age), front bumper (missing), body, ESC, red wheel nuts, wheel hex adapter, RX, and a few red Super Sabre sprues).

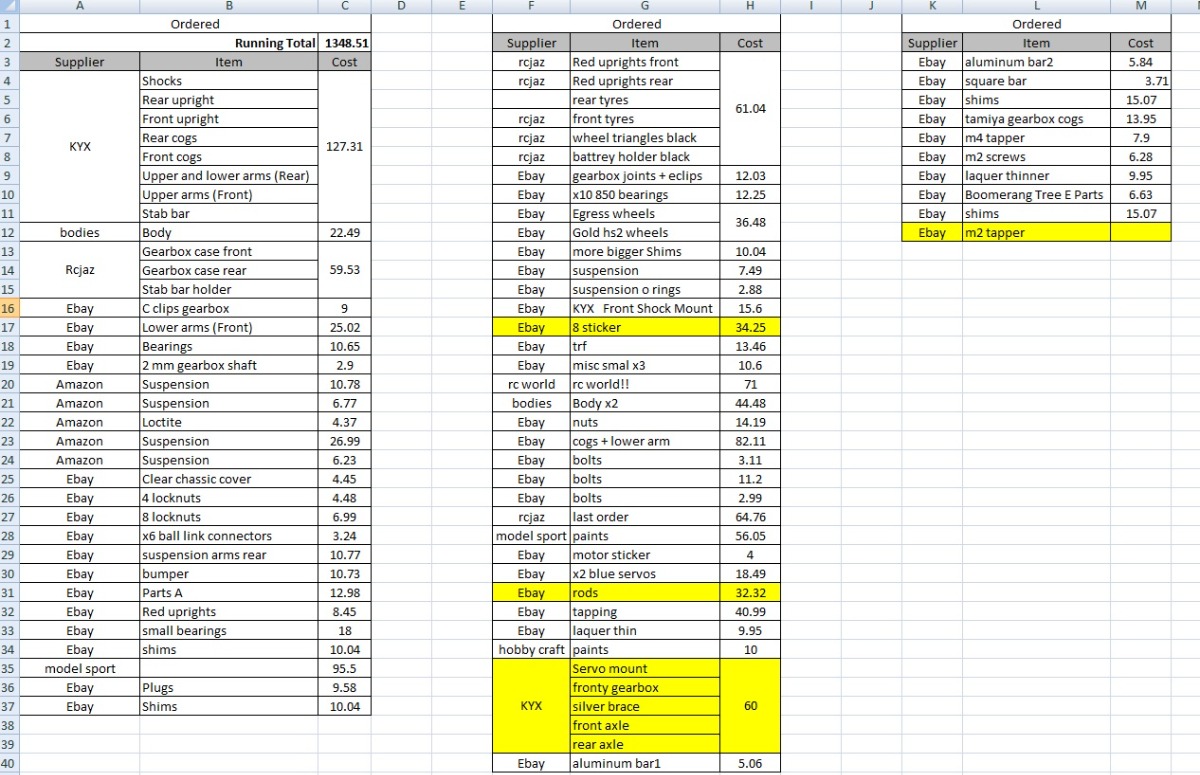
So why did it cost in excess of £1500 (more than I originally reported)? Here's how.

The more I prepared to get this project underway, the more I fell into the trap of “ohhh why don't I just improve this or that”. The real tipping point came when I decided to put a brushless motor in and the 'would be nice to have' invariably became 'need to have' and that's where the cost shot up. The reason for the 'need to have' was because I was reluctant to build something was likely going break or fail. And I’m specifically talking about the gear boxes. I had images of the original gearbox straining under the loads of the 3300kv motor and/or shearing the nylon gears. Once I decided on that, nylon gears were replaced with metal ones.

I hasten to add, as you’ll see from the list I’ve put together, many parts were not used. For example, a complete set of metal RCJAZ metal gearbox cases, all 8 suspension arms and uprights were ordered but not used as the KYX ones were far superior. I ordered 3 bodies, 6 paints to try and get the right colour (total failure), extra servo, double wheels and tyres etc.


So while it cost me around £1,500 due to all my mistakes, alterations and change direction craziness, the cost of the finished Winger (i.e. just parts installed) is closer to £1,000. Probably less. And clearly if you reuse most of the original Tamiya parts it’ll be a lot less. 

Attachments:
The following user(s) Liked this: stingray-63, 1972 LeMansGT Jim, Scanox

Please Log in to join the conversation.

Winger help ID 9 months 1 week ago #81710

  • Pants
  • Pants's Avatar Topic Author
  • Offline
  • No Guts No Glory!
  • No Guts No Glory!
  • Posts: 13
  • Likes received: 9
Parts

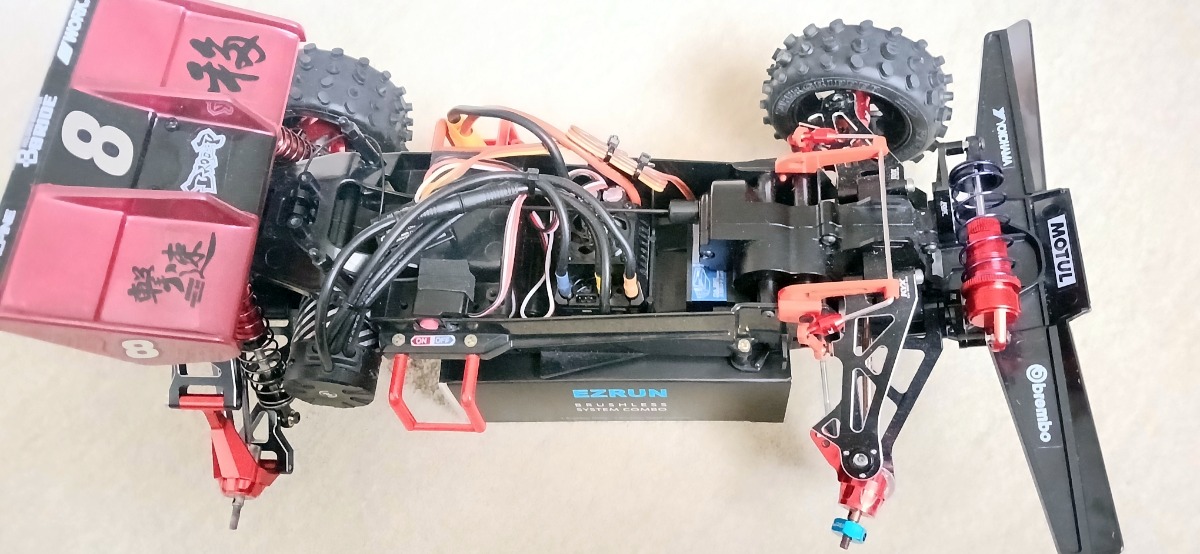
Without further ado, here is the main upgraded parts list. I've attached a complete spreadsheet breakdown of each item and the quantity I've bought and the cost as well. A few more items were subsequently purchased which pushed the cost just over the £1,500 – but can’t remember what they were):

I'm using the rerelease manual to reference parts just to be avoid any confusion.(Link here ---> won't let me link but if you search 'Tamiya Boomerang PDF download' it'll pop up  ).
  •  Single front damper/suspension: Tissting 2Pcs RC Shock Absorber, 85mm / 3.3in Aluminum Alloy Damper Oil Pressure Adjustable
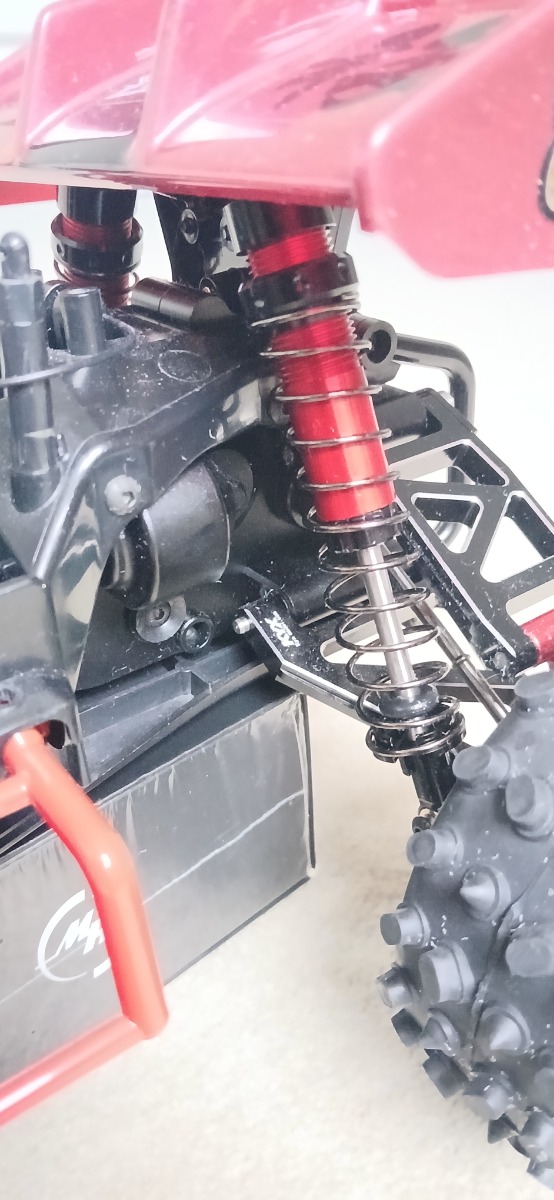
  • Rear damper/suspension: INJORA RC Shock Absorber Set 4pcs Traxxas TRX-4 D90 (110mm). Hard springs used
Note that the original Tamiya Boomerang rear suspension (different to the Super Sabre or Hotshot 2), is actually very good. Both in terms of geometry when fitted to the buggy and build quality. I rebuilt (but didn’t use) the original suspension only replacing the rubber o-rings and seals and it was as good as the day it was made, in fact probably superior to the ones fitted to my Winger (which were obviously chosen to copy as closely as possible the one I was trying to duplicate).
  • KYX gearbox cases front and rear
  • KYX metal gears
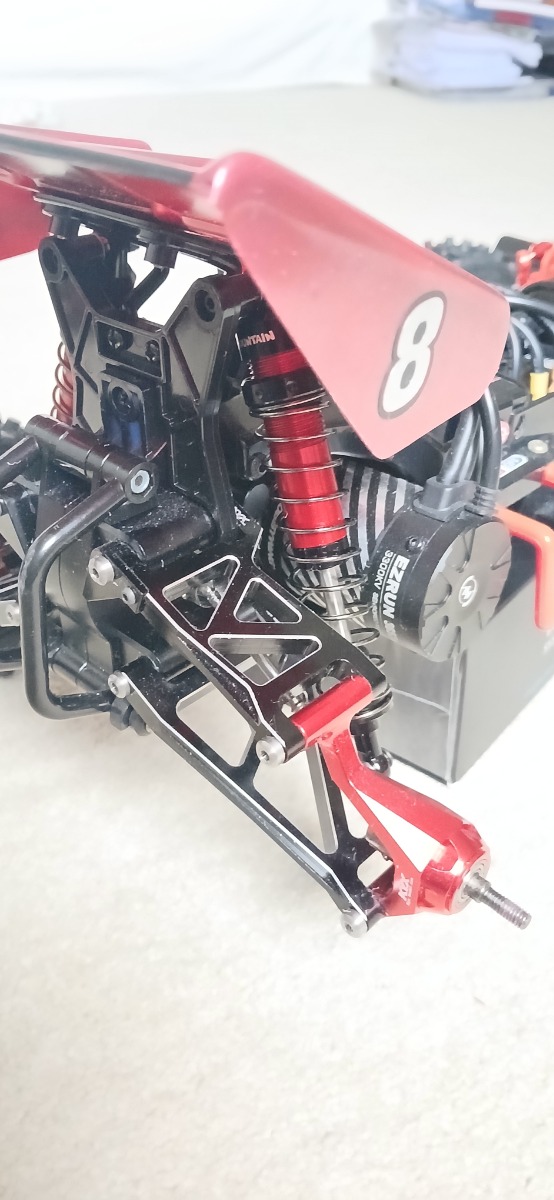
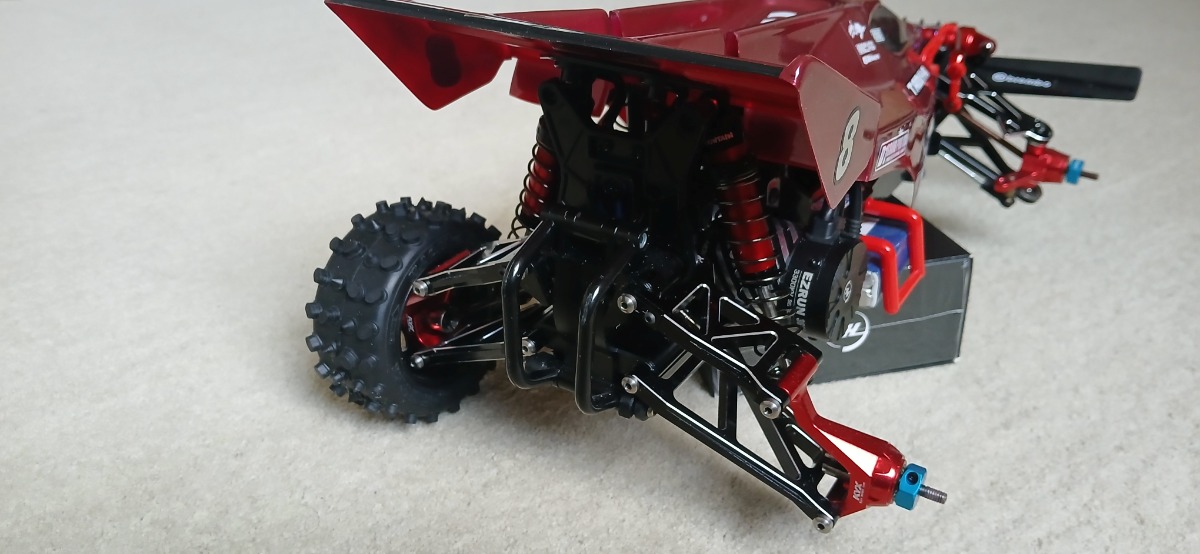
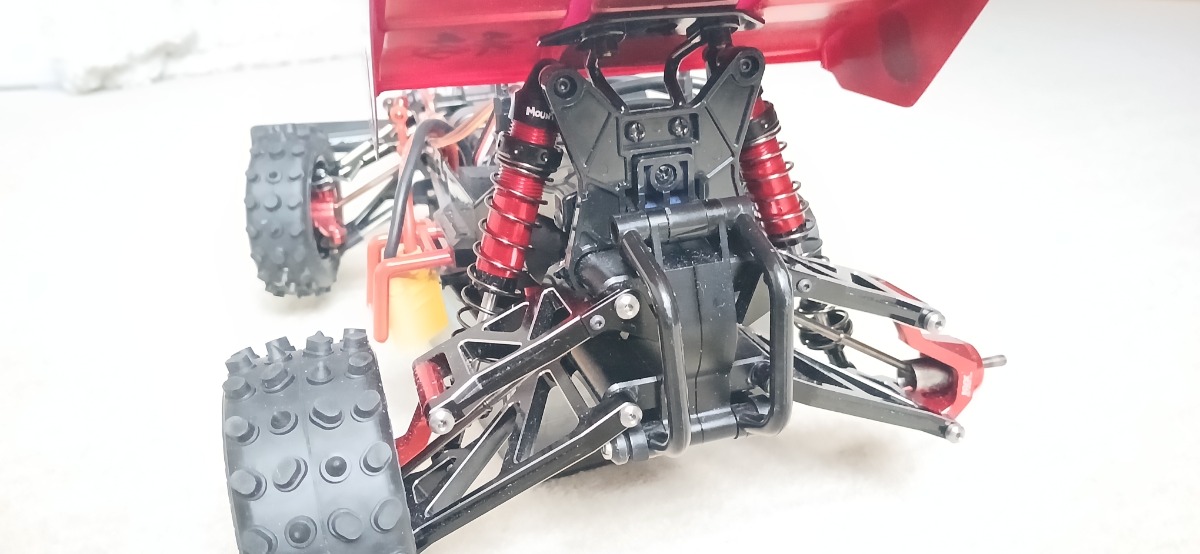
  • KYX upper and lower arms front and back. Although the original look nicer, there is absolutely no slop or flexing. A thing of beauty.
  • KYX uprights (all 4)
  • KYX axles
  • KYX front suspension stabiliser
  • Metal Hex adapters for the Egress wheels
  • Winger body (obviously)
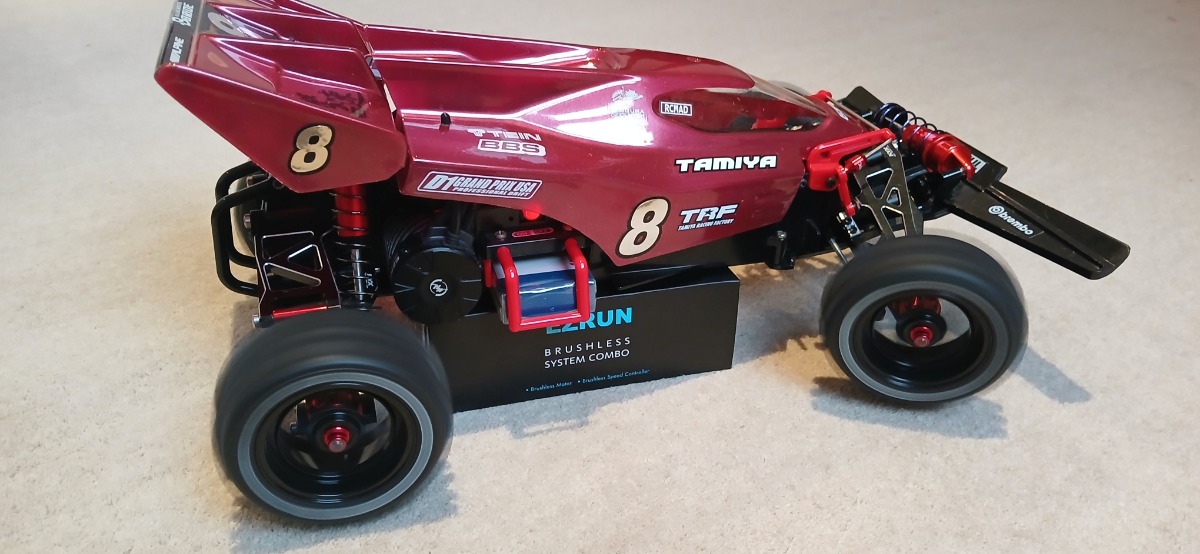
  • Sticker set x4 (can’t believe I found these. It took over 2 weeks of searching Google images, trying to create my own, speaking to people on forums, shops etc)
  • Fully ball raced (inc BA9, the prop joint which was surprisingly expensive)
  • Egress wheels (x8, 1 running set, 1 'display' set)
  • Standard oval block tyres x8
  • Gearbox joint (Section 2, part BA18 in instruction manual). Because the new gearbox cases are based on the re-release Boomerang which are different.
  •  A selection of shims to reduce slop in the gearbox but were untimely not used due to better KYX gearbox tolerances
  • Super Sabre red A sprue (stabilizer connectors A6, A5, battery holder)
  • Boomerang E sprue (part E1 and E4). I did purchase and aftermarket metal part but there was too much play which resulted in more slop (if that’s even possible) so I simply replaced the original plastic part and is actually quite good)
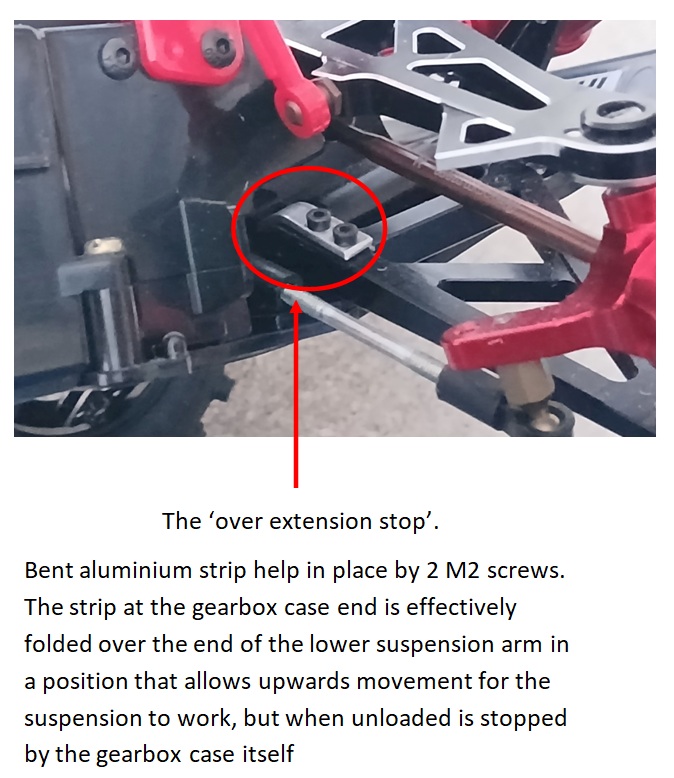
  • Varying thicknesses of aluminium strip, tap and die sets and M2 screws to create the front suspension ‘over extension’ stop (see build).
  • Hobbywing Combo MAX10 G2 80A ESC + 3300kV BL 
    You do not have permissions to access this page.
    K G3 Motor (comes as a combo)
Attachments:

Please Log in to join the conversation.

Winger help ID 9 months 1 week ago #81711

  • Pants
  • Pants's Avatar Topic Author
  • Offline
  • No Guts No Glory!
  • No Guts No Glory!
  • Posts: 13
  • Likes received: 9
Build
  • First a small correction. I originally thought a Winger could be built with any Hotshot family (Super Sabre, Hotshot 2 etc) chassis, but I’m not sure it can as the rear wing on the Winger requires the Boomerang parts for it to sit at the correct height/position. The main body is also shaped to sit on the Boomerang’s original hex body holders (D1).
  • My original Boomerang was dismantled and all plastic parts were washed and brushed in warm soapy water (incredibly satisfying). Metal parts were cleaned, polished and degreased as appropriate. The only part I didn't bring back to original was the motor as at this point I knew I wasn't going to use it. I rebuilt the car in exactly the same order as the instructions.
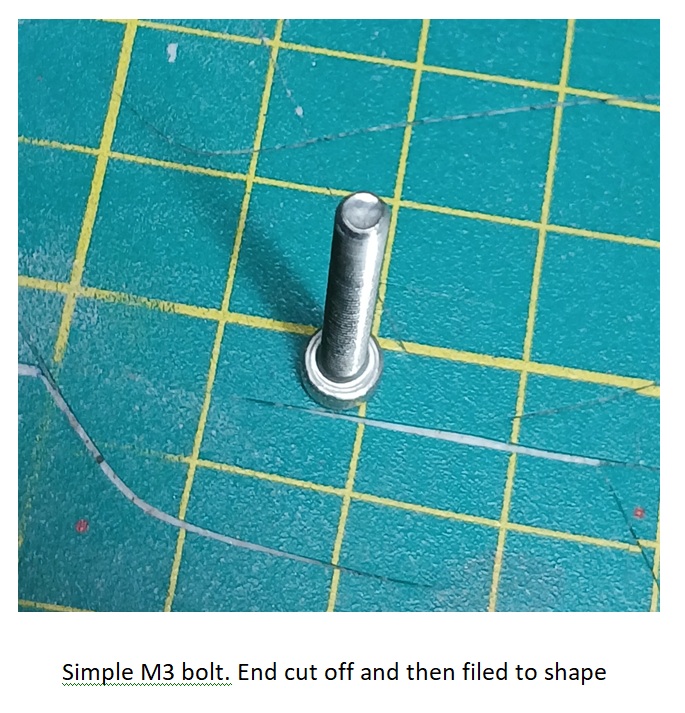
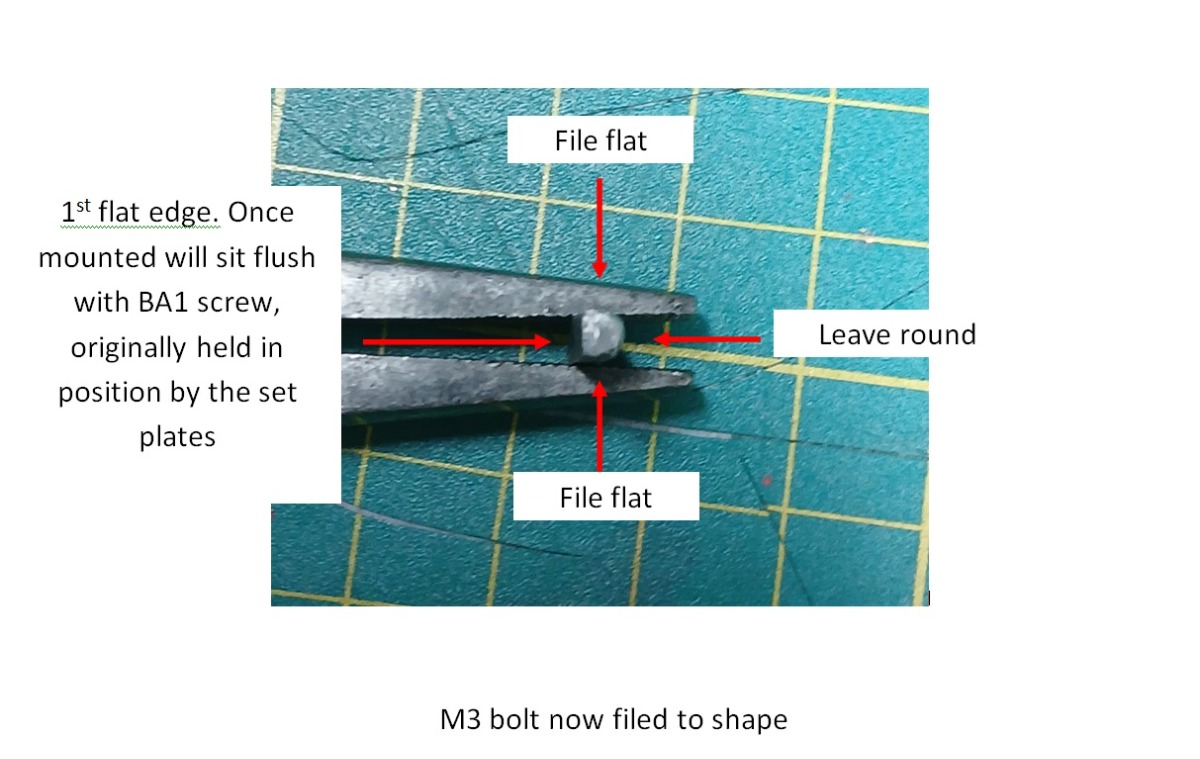
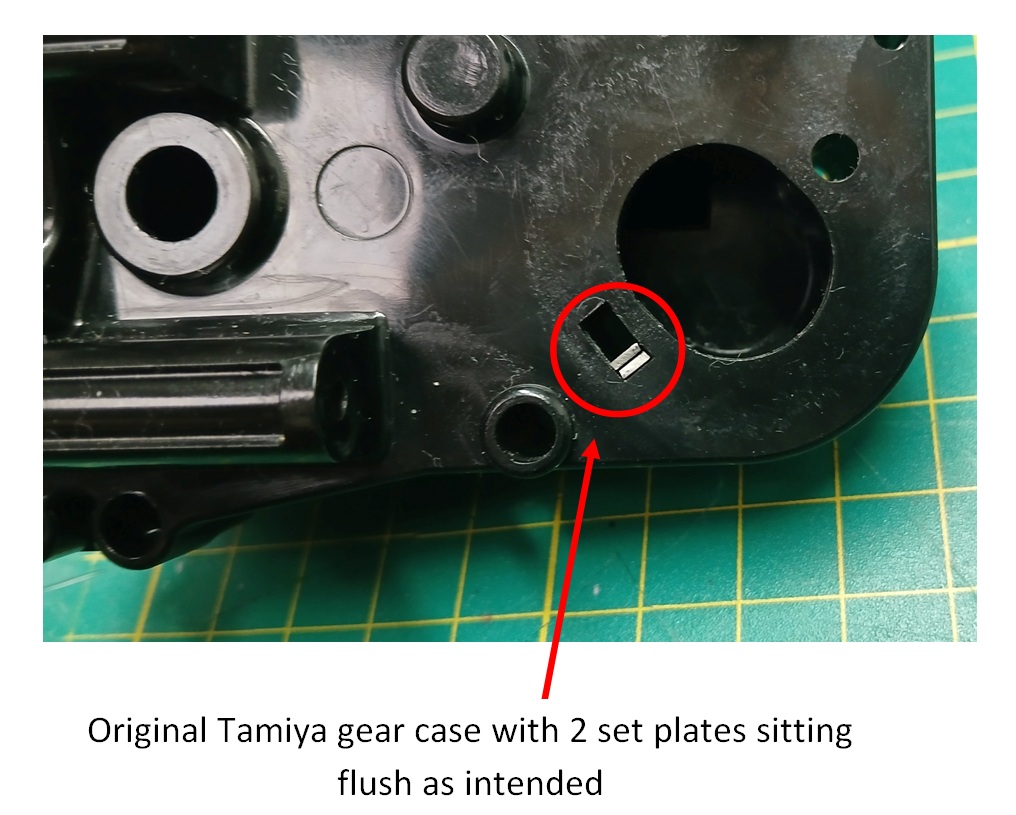
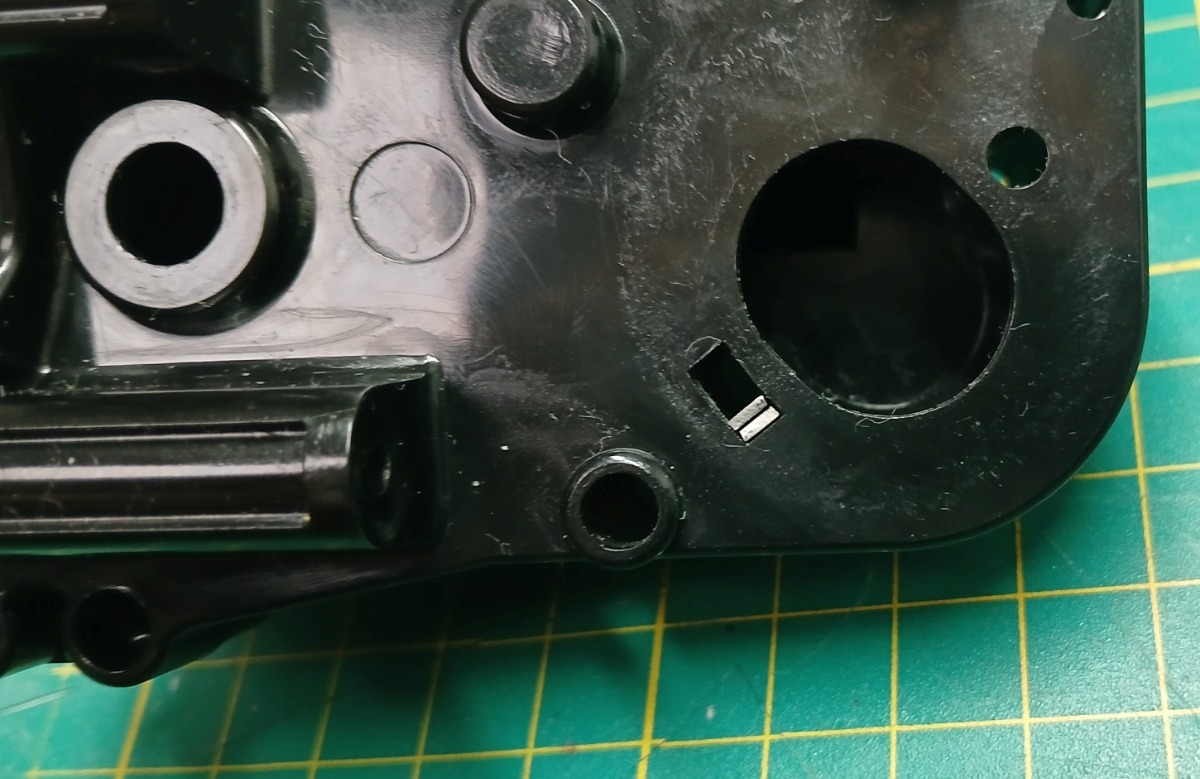
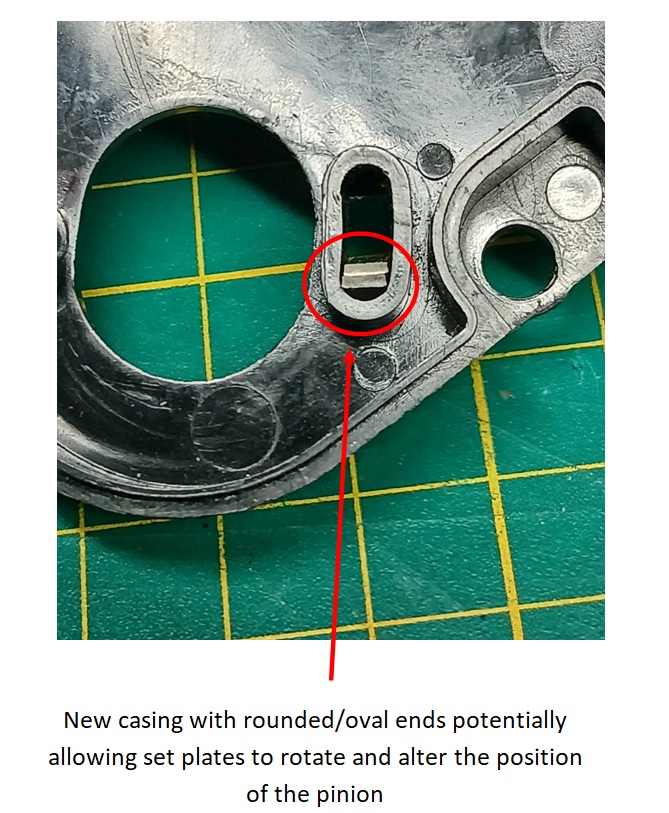
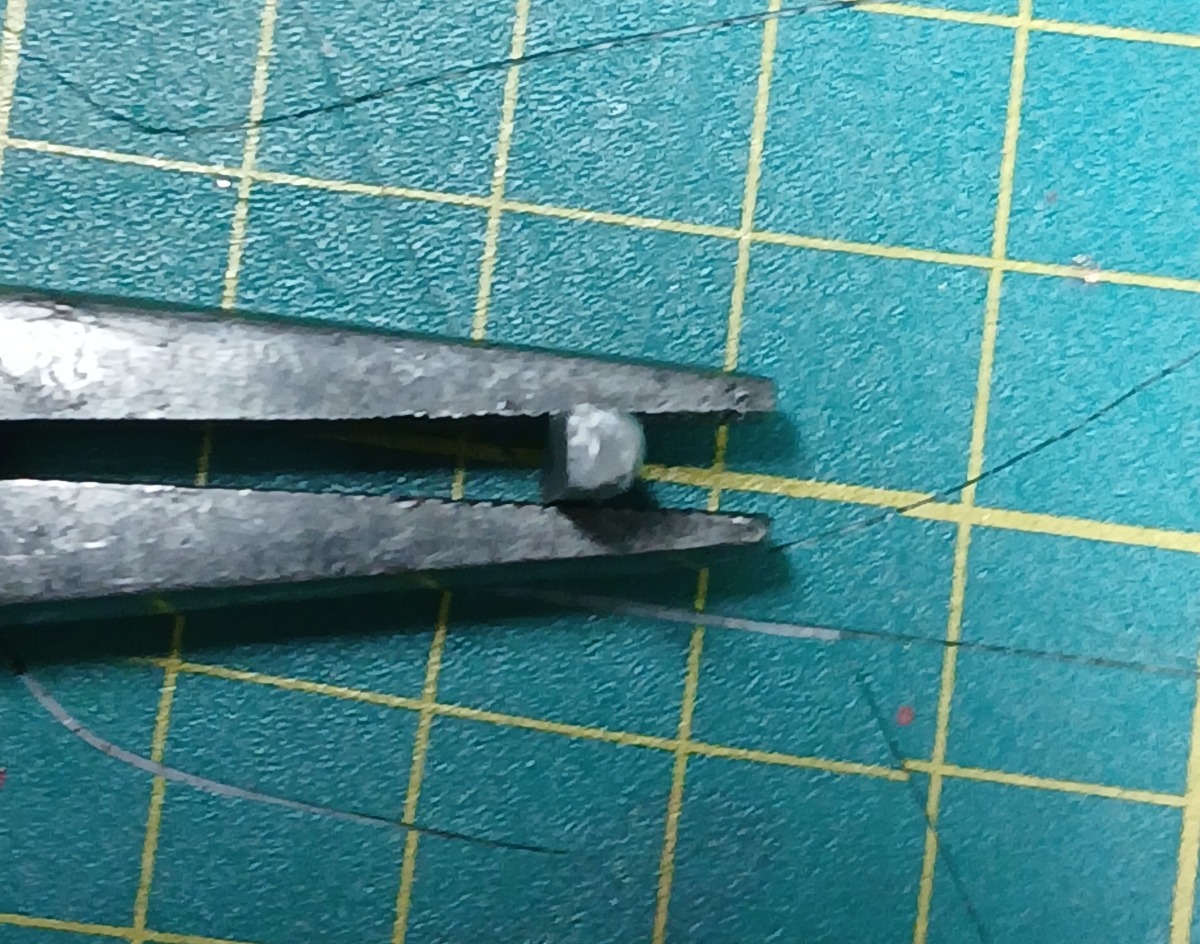
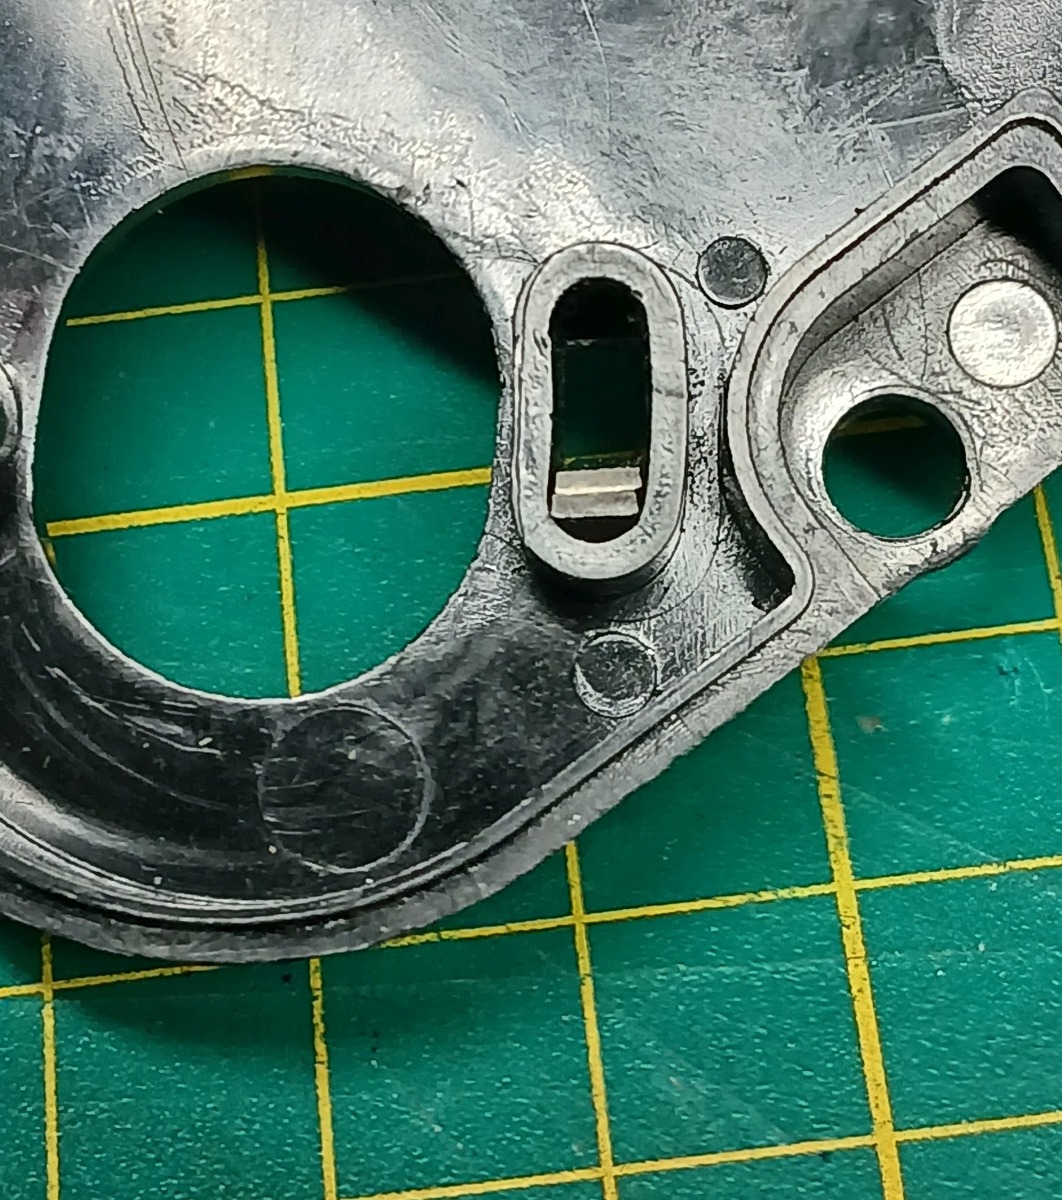
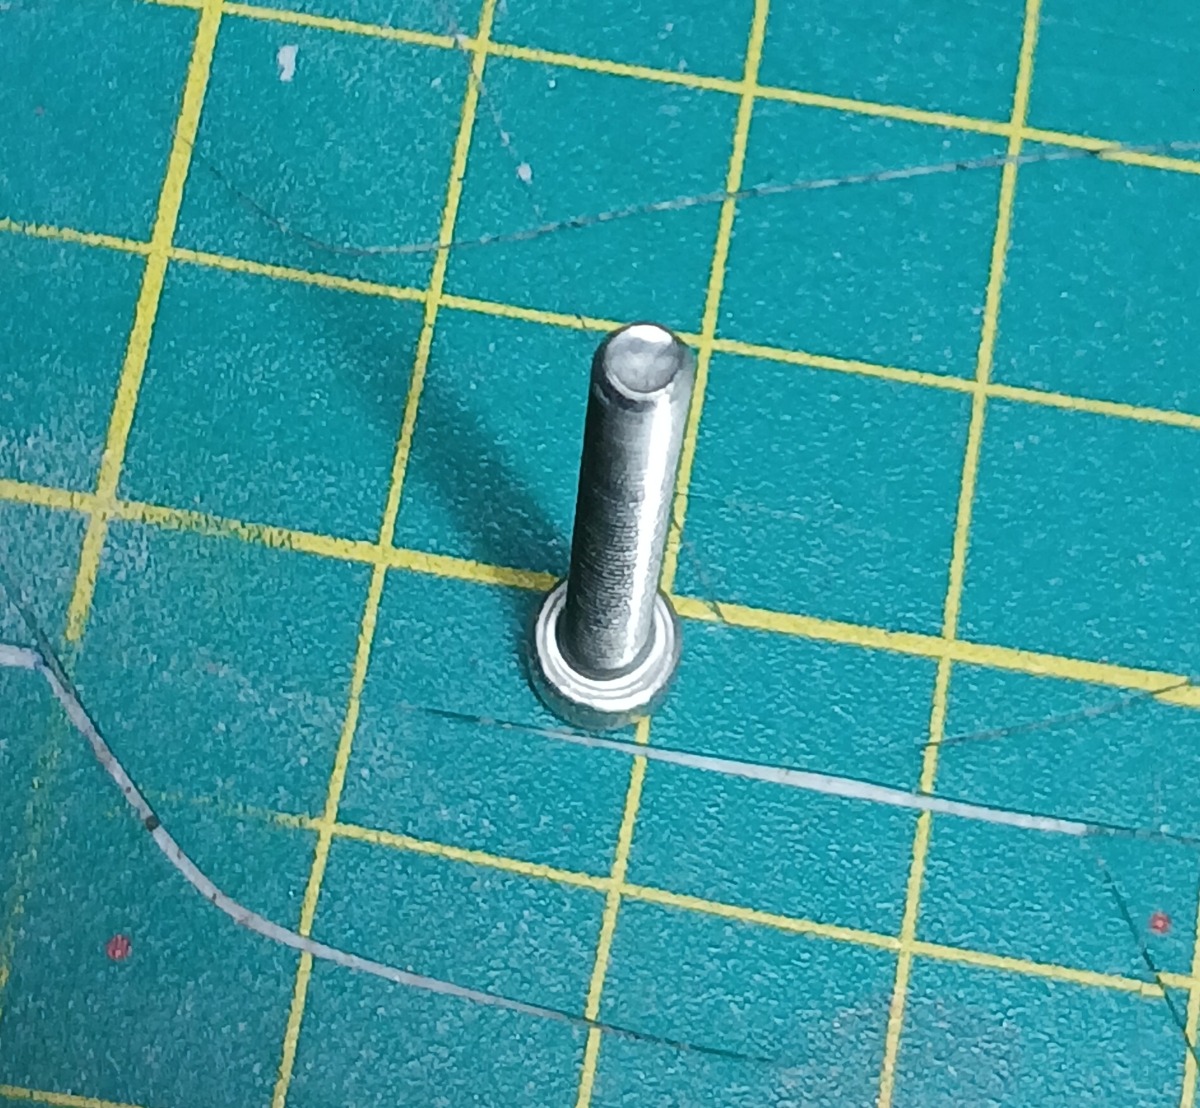
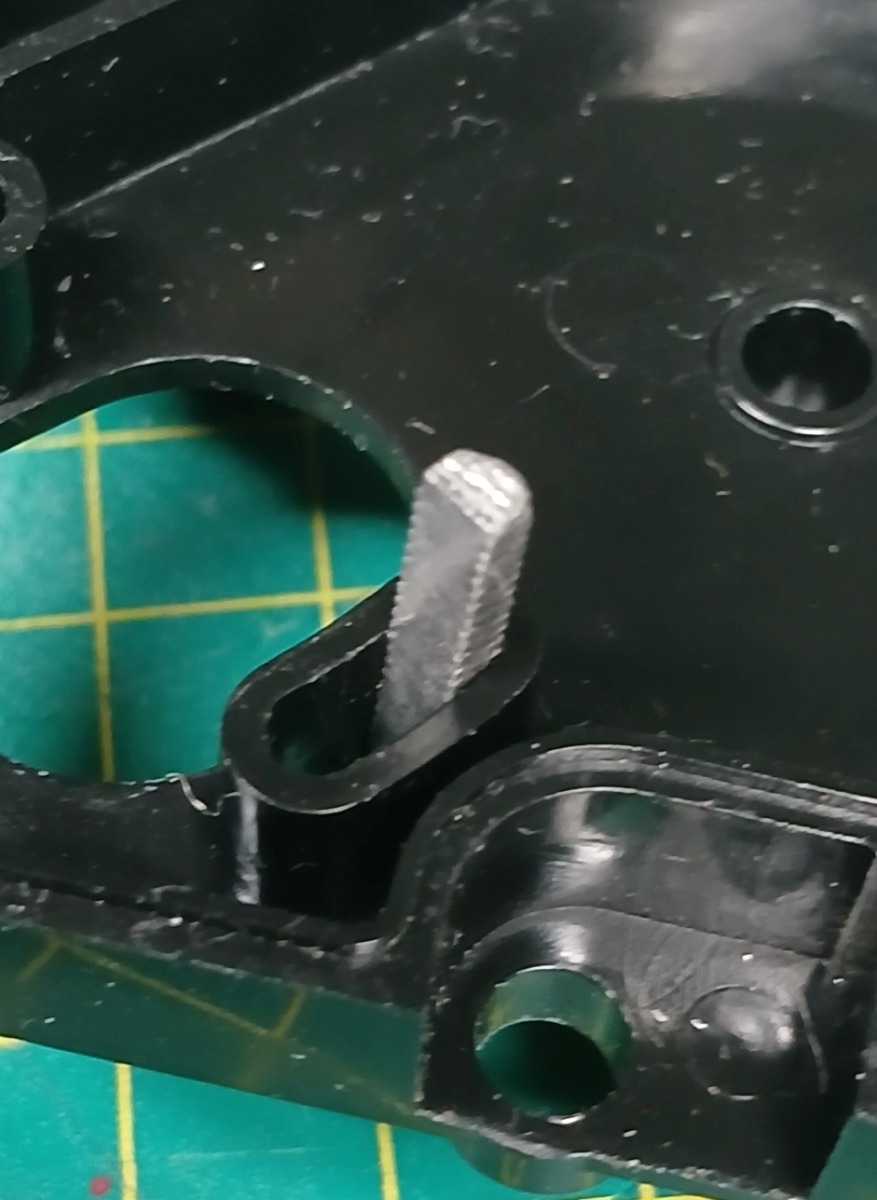
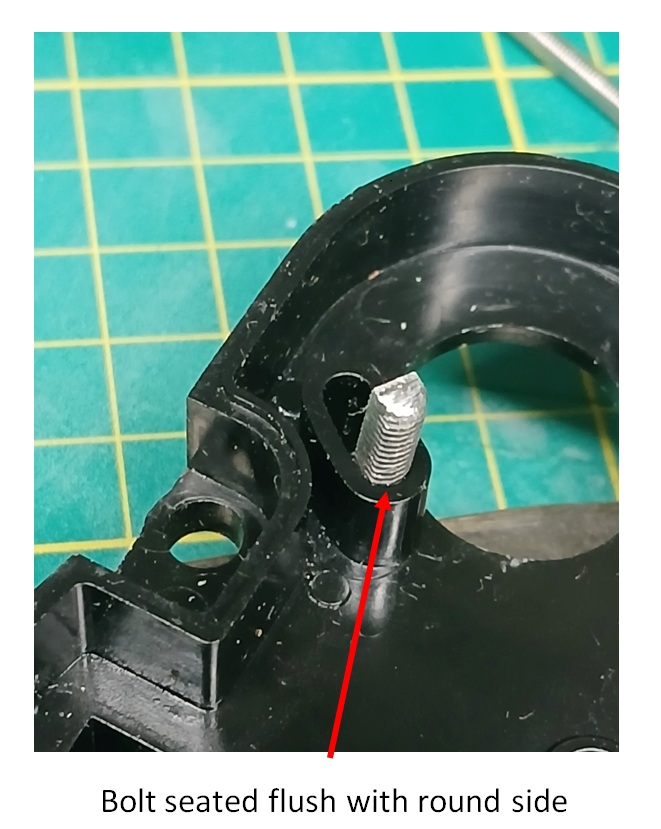
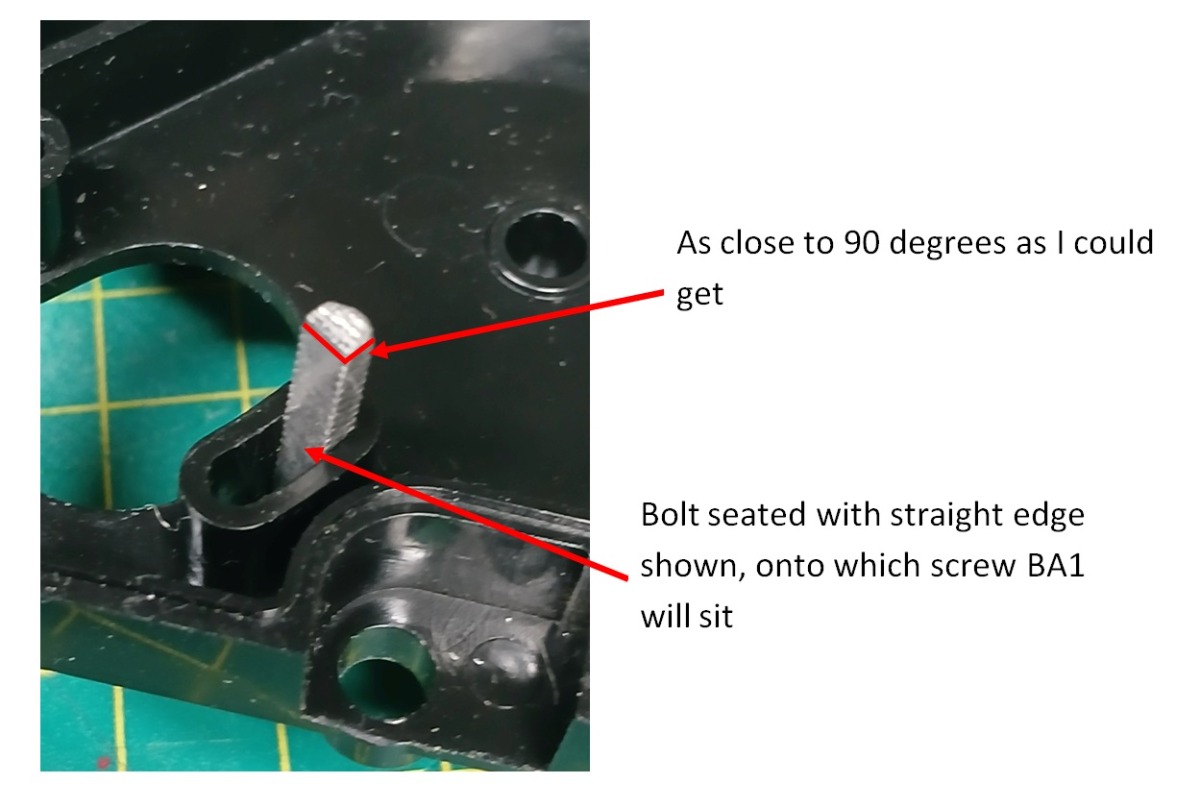
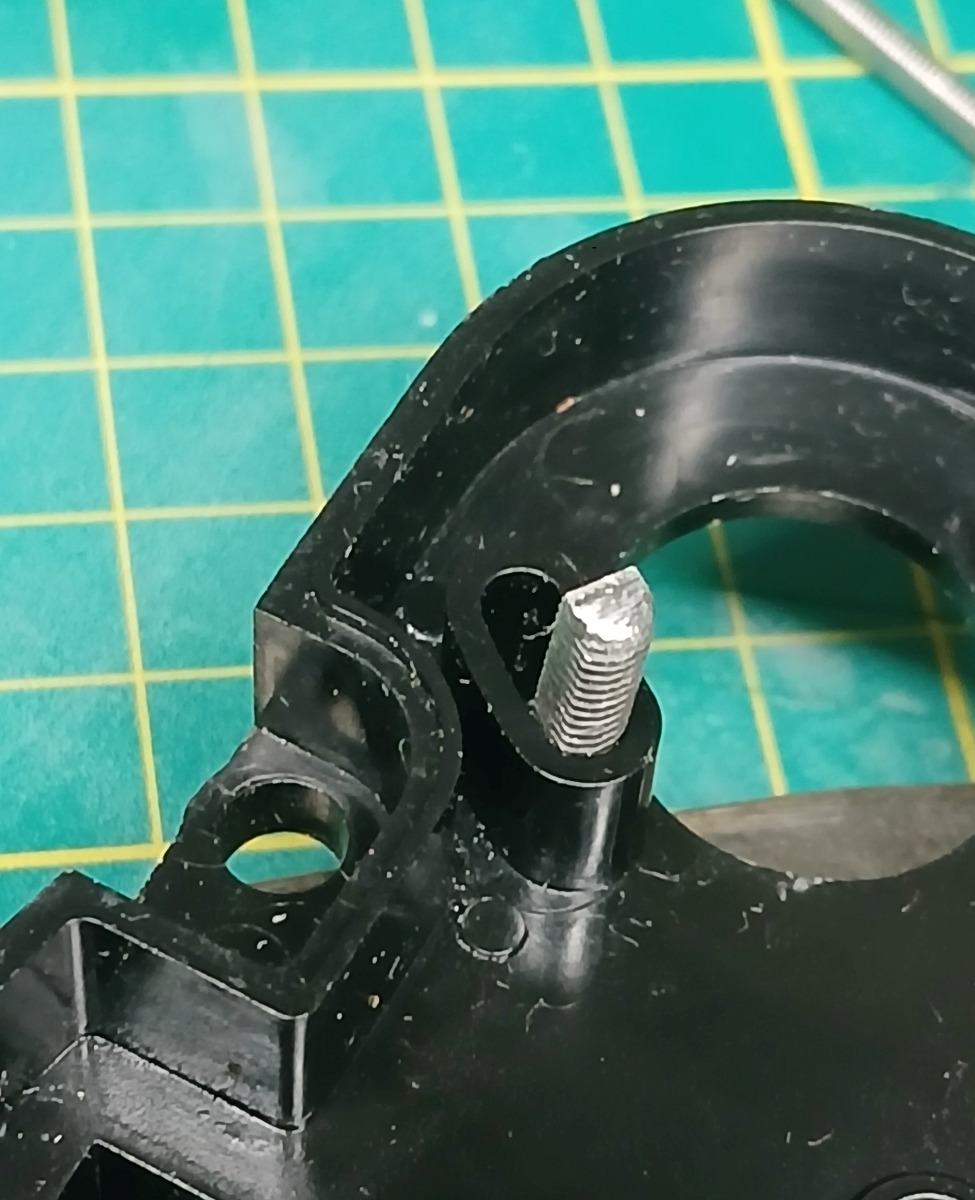
  • The new motor is a direct replacement in terms of size. However unfortunately the new rear gearbox case has a semicircular space built/cast into them (as opposed to straight) that hold the 4 set plates (BA15) sit (see pic – it’s difficult to explain in words). If left unmodified it could result in plates potentially rotating and either tightening or loosening the pinion/gear mesh which is not what you want. To get around this I took a bolt one size larger that the hole in the case and filed it down to the correct width for the motor position (i.e. if the case was M3 I selected an M4 bolt and filed that to fit).
In a vice, you initially start to file down one side to create a flat surface. This will be the face that sits against the engine bolt. The opposite end of this filed surface will be left circular (i.e. you leave the shape of the bolt) untouched and this will sit perfectly in the new metal engine case. All you have to do now is rotate the bolt 90 deg each way and file flat to create the 2 sides. So you end up with 3 flat surfaces and one round. By filing the side that is in contact with the positioning engine bolt BA1 to the correct ‘height’, you end up with a perfect position that replaces the 4 set plates. Repeat to create a second one which will replace the second set of set plates. The BA1 screw will be sandwiched between the new filed bolts. Obviously if you change the pinion size attached to the motor you need to redo this work.
 This is may seem like a lot of work reading it, and not very clear (apologies, I suck at explaining), but if you reread it step by step it does actually work.
 I was a bit dubious at first but it works very well. I'll try to either draw a pic or attach an image of a spare I made (if I can find it). Clearly this work is only required if you're using the newer case. If you're using the old Tamiya case it's a straight replacement and no work required.
  • The Boomerang blue suspension mount, brace and spoiler attachment parts and screws were painted black. Over time this will flake and need repainting.
  • Gearbox case/gears. The parts are a direct replacement. However when it came to closing and tightening the front gearbox the gears inside stared to bind until they couldn’t rotate. It turned out that part E2 (Section 7 in instruction manual) sat slightly proud and had to be trimmed back a bit so it wouldn’t press against the counter bevel gear when the case was closed and tightened down. I guess it was built to slightly different tolerances. This was really the only modification I had to make to any of the replacement parts other than the front lower suspension arm (see below). Everything metal was lubricated with molybdenum grease.
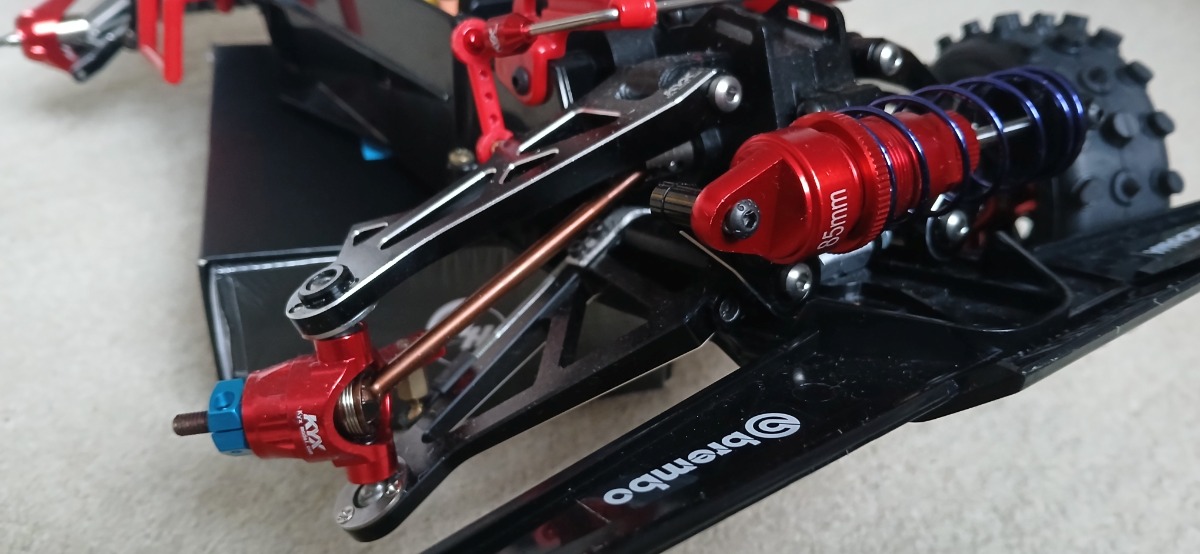
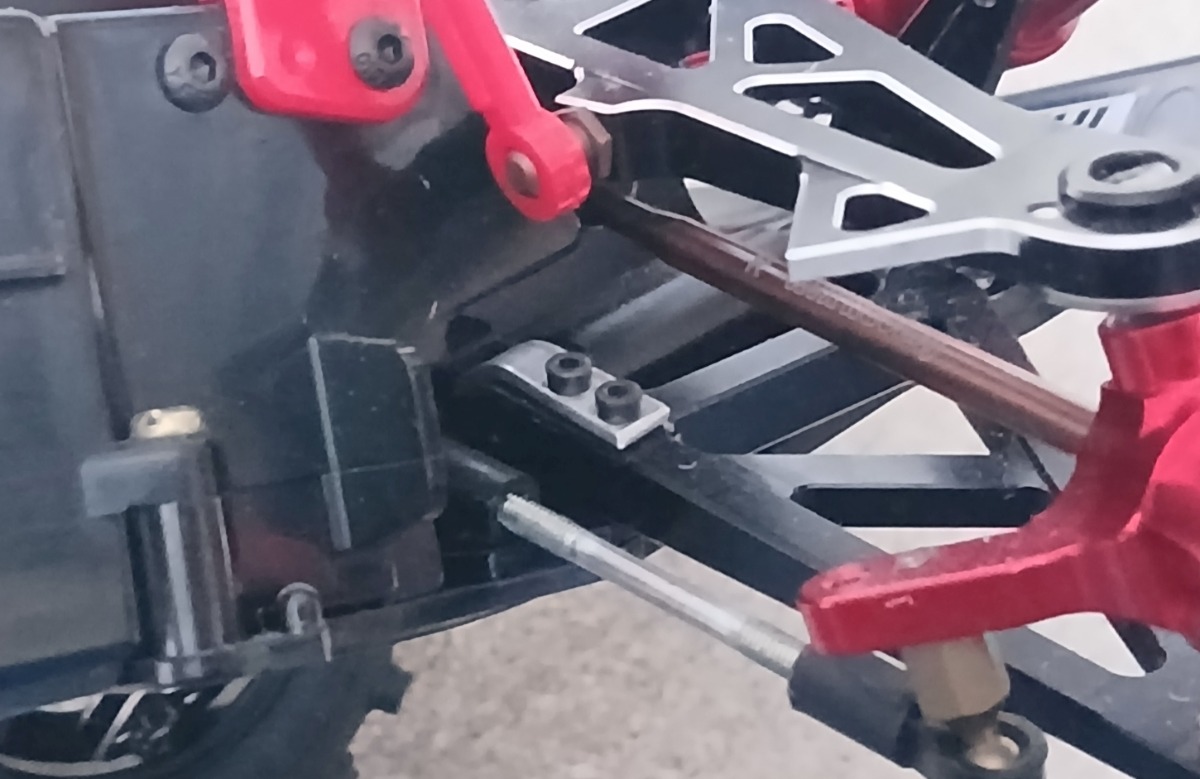
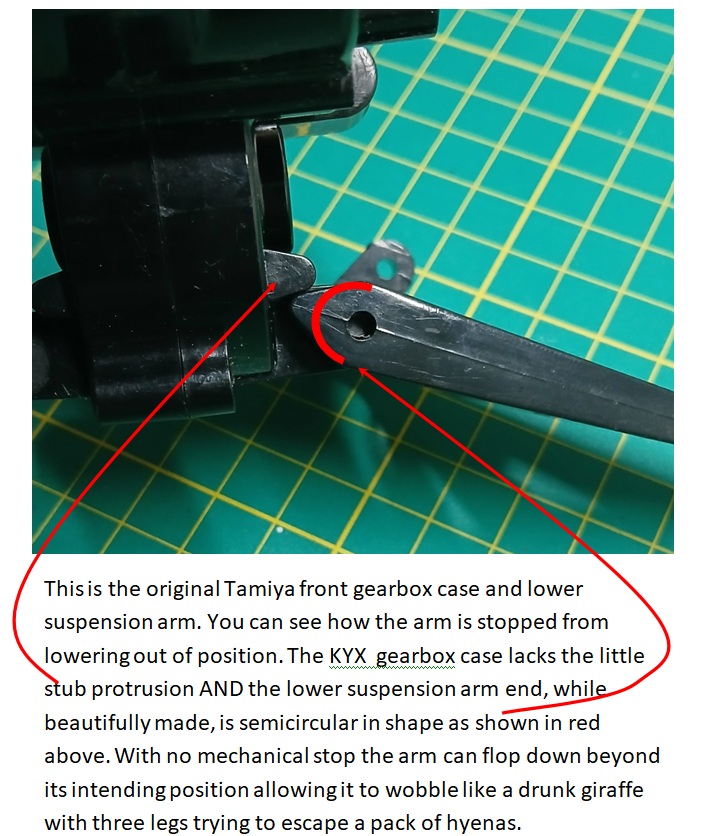
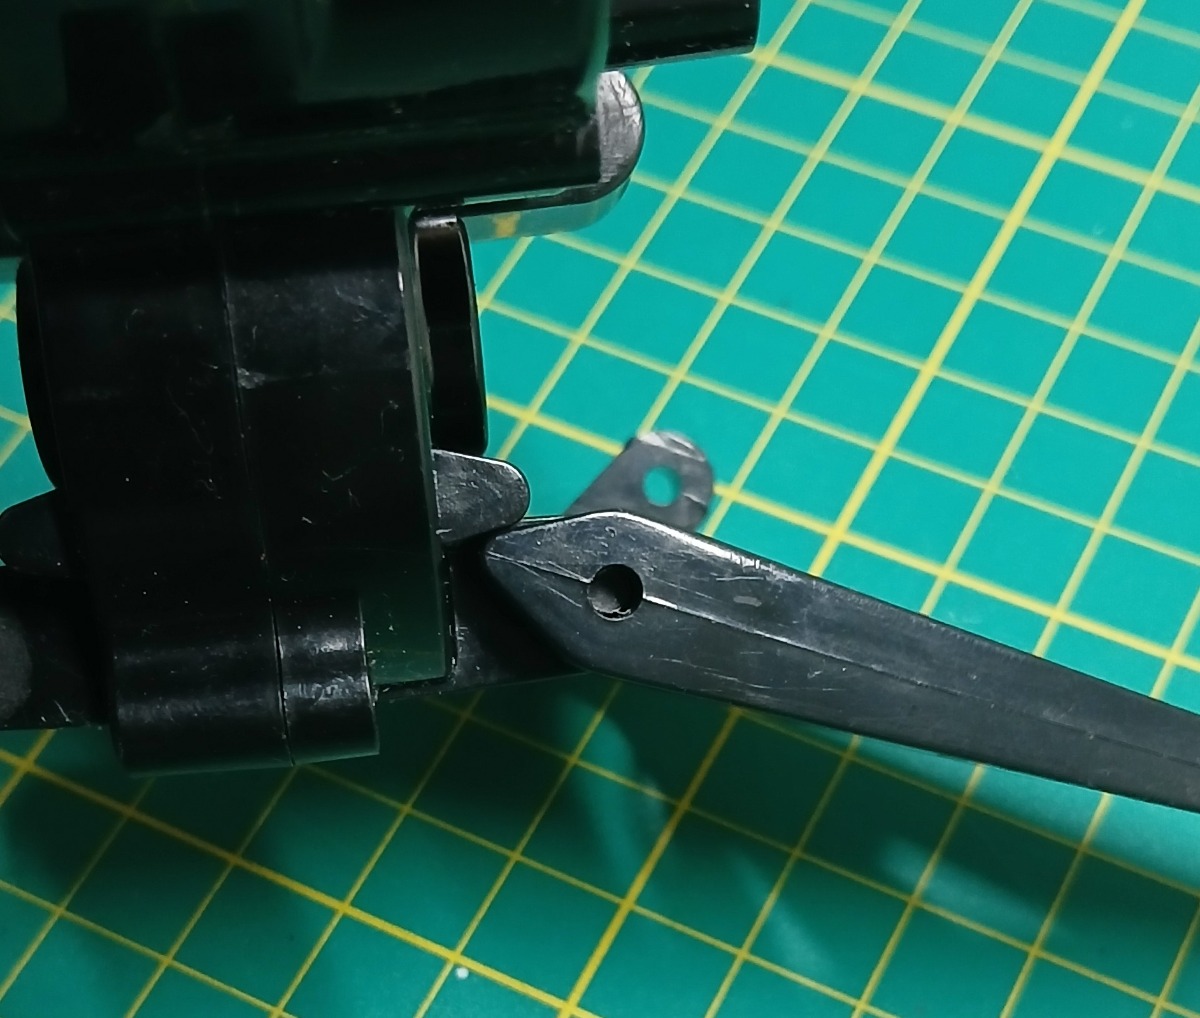
  • The front lower suspension arm of the KYX part lacks the small triangular extension that touches the corresponding part on the gearbox case to stop it over extending (see pic) rendering the entire suspension system useless. To cater for this I had to create my own and was easier than expected. I cut out 2 strips approx 5mm x 20mm from 2mm aluminium strip. I drilled 2 holes into the lover suspension and tapped them for M2 bolts. 2 corresponding holes were drilled into the strips and attached once I had bent the strip to a correct angle for the suspension geometry to work (the bend and radius was based on the circular end of the attachment of the lower arm). The aluminium strip ‘hits’ the gearbox case stopping the suspension flapping past its designed position. This modification sounds complicated but it’s not.

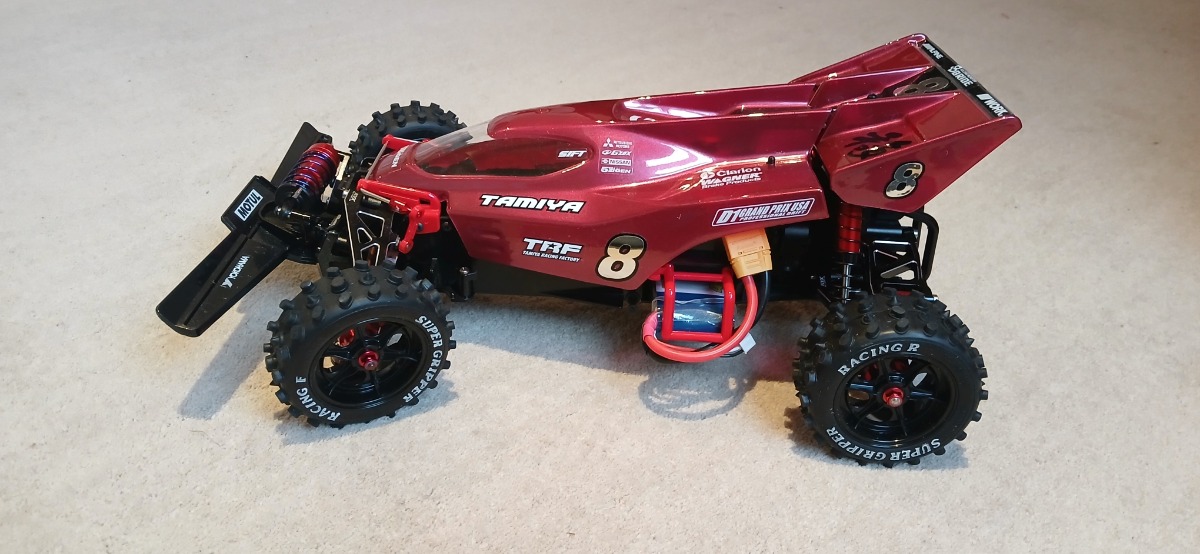
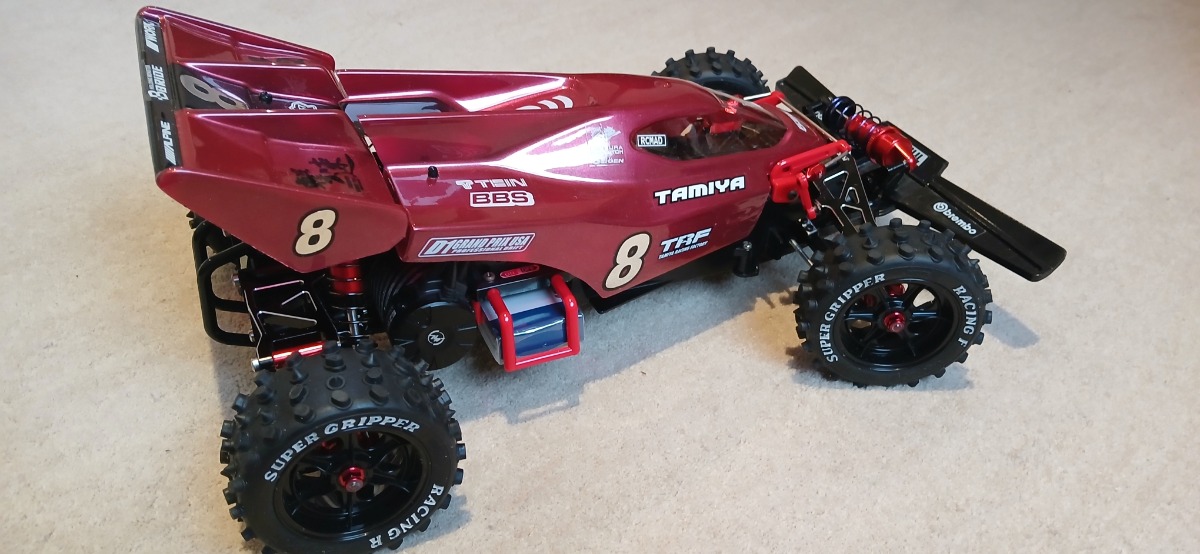
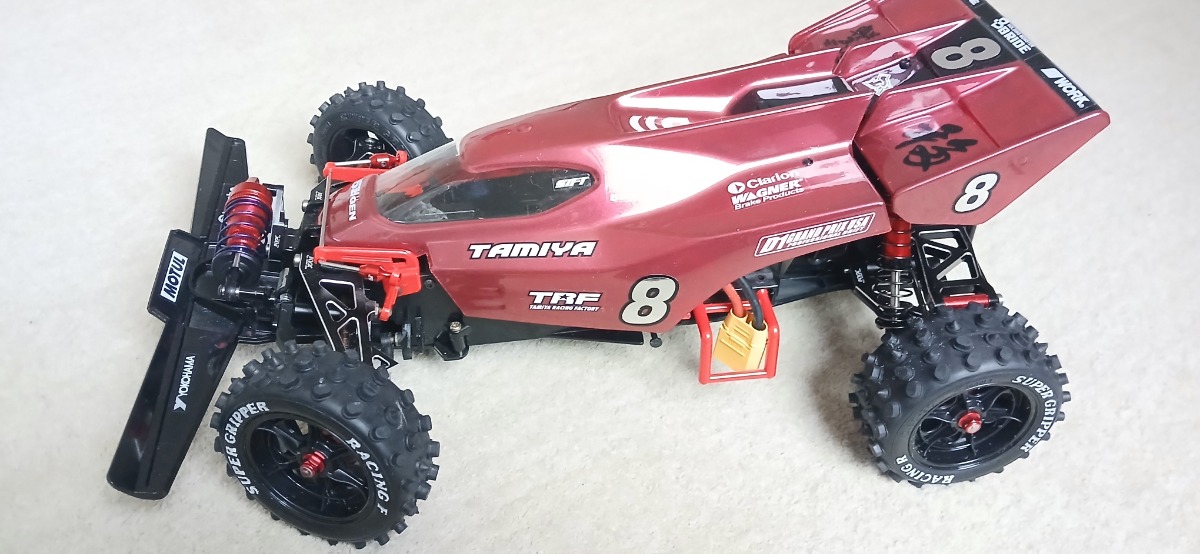
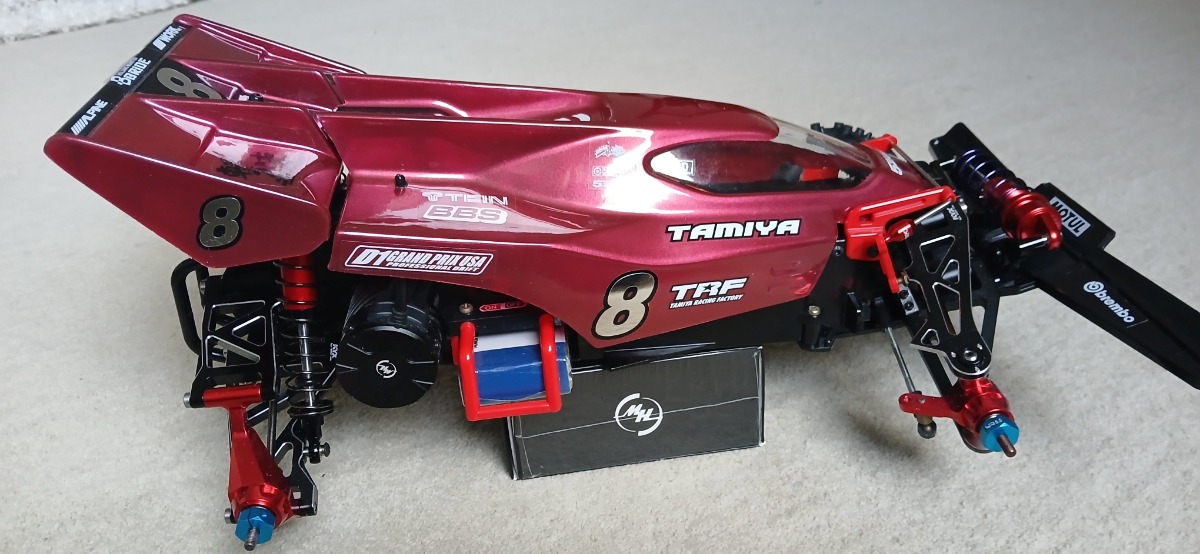
  • Body: I bought 6 cans of different paint but ultimately only 2 were used. As mentioned, when I mixed them originally it was a perfect match, but as it went down, it dulled a bit, and further as it dried until you see in the picture. I decanted Tamiya paint cans, allowed to degas, mixed (to what I thought was a perfect match) and then shoot through an airbrush at a fairly high pressure setting. I read somewhere that Tamiya PS (polycarbonate) paints are lacquer based, but when I thinned my mix to pass through the airbrush, parts of the paint jellied and was not as smooth as I would have liked. Not sure if it was me, the paint, or maybe I didn't allow the paint to degas enough but something was amiss.
  • Masking was a standard affair and quite satisfying. If I had more patience I would like to add some black trim around the window to recreate a seal. I haven't found tape flexible enough to handle the rear curve of the window. I might create a mask - we'll see.
  • As it turned out very little was reused from the original buggy. Original parts were: chassis, transmission shaft, metal gears (Parts BA24), rear suspension frame (C9), upright frame holder (C6), spoiler holder (A1 and A3), hex front bumper stay (BA17), rear gearbox attachments (B2 and B6), hex body holders (D1), servo holder (D2), steering servo slider (E1 and E4), all screws.
Attachments:

Please Log in to join the conversation.

Winger help ID 9 months 1 week ago #81712

  • Pants
  • Pants's Avatar Topic Author
  • Offline
  • No Guts No Glory!
  • No Guts No Glory!
  • Posts: 13
  • Likes received: 9
Attachments:

Please Log in to join the conversation.

Winger help ID 9 months 1 week ago #81713

  • Pants
  • Pants's Avatar Topic Author
  • Offline
  • No Guts No Glory!
  • No Guts No Glory!
  • Posts: 13
  • Likes received: 9
Attachments:
The following user(s) Liked this: stingray-63

Please Log in to join the conversation.

Winger help ID 9 months 1 week ago #81714

  • Pants
  • Pants's Avatar Topic Author
  • Offline
  • No Guts No Glory!
  • No Guts No Glory!
  • Posts: 13
  • Likes received: 9
Attachments:

Please Log in to join the conversation.

Winger help ID 9 months 1 week ago #81715

  • Pants
  • Pants's Avatar Topic Author
  • Offline
  • No Guts No Glory!
  • No Guts No Glory!
  • Posts: 13
  • Likes received: 9
Complete
  • I haven't run it yet, but it does leave black skid marks on the lounge floor even when you just look at the throttle and frankly this thing scares me. Bear in mind the last RC car I played with (other than a Frog I built last year which puts a massive smile on my face) was with back in the 80's was a 959 and a Super Sabre. Depending on how the Winger behaves, I may or may not stick a gyro on it.
  • It weighs a lot. All the metal parts, motor and battery etc bring it up to 2.1kg compared to the claimed 1.3 – 1.4kg (including battery and radio gear) of the original which I think we can all agree is ridiculous. I have no doubt the new motor will help but clearly this car will be competitive at absolutely nothing. In fact I have seriously concerns at how it will handle because as soon as this thing flips at speed something will probably break.
  • Questions/doubt about the build (for me): If you look closely at the original Winger (not mine) picture, the red wheel nuts appear to have a highly polished centre section. I’m not sure how the original builder has done this but it does look nice. Maybe it’s just the low quality picture but I like the effect and will try to duplicate it. Also, while I’m happy that I got hold of the correct and sticker/decal set and happy with the placement of most of the stickers, I had only one reference picture (and therefore only one side) and the some of the image is out of focus. So the side we can’t see remains a mystery while the out of focus parts are just discernable enough that after an entire evening studying and analysing the pic I’m confident that I’ve got the correct stickers. Oh, the TRF101 sticker no longer exists, I’ve replaced it with the best I could find. And you’ll notice that on either side of the bumper my stickers are totally different and blatantly a work of fiction while the ‘TAMIYA’ on either side of the cockpit is slightly larger (and incorrect).
  • One day I might get another body to get exactly the right colour. I've also toyed with the idea of using the Super Hotshot/Hotshot 2 chassis which is enclosed and offers better protection from the elements when is zooming around. Who knows. For now I'm calling it complete.
That's it. Hope it's of use/interest to someone. Let me know if you have any questions/anything unclear or want more pictures and I'll do my best to answer. I've cut/copied and pasted on another website as a few other people helped out and asked over there too. 
Attachments:

Please Log in to join the conversation.

Winger help ID 9 months 1 week ago #81716

  • Pants
  • Pants's Avatar Topic Author
  • Offline
  • No Guts No Glory!
  • No Guts No Glory!
  • Posts: 13
  • Likes received: 9
 
Attachments:

Please Log in to join the conversation.

Winger help ID 9 months 1 week ago #81720

You can keep trf stickers. This winger is awesome.  Congrats 

Please Log in to join the conversation.

  • Page:
  • 1
  • 2
Moderators: caprinut, stingray-63, AndyAus
Time to create page: 0.186 seconds