|
Some of the elements of this project materialised today with an package directly coming from my friend yogibear from down under...
I checked, and the size is no good Well, that was expected anyway On the other side, what is really important at the time is the arrival of the Prototype bodyshell : this means we will be able soon to pull the Hunter prototype model in real... I buy kits to built and ru(i)n them
The following user(s) Liked this: yogi-bear
|
|
Please Log in to join the conversation. |
|
It may be time for me to start something here...
Trimmed one of the bodies and checked fitting... It's perfect... I will need to dye the white nylon parts... A recent find gave me more information on the colors to target (likely another pre-sales catalog sent to reseller to show the future models, back in 1983 or 1984 when Marui was just starting the importations in Europe - Importation started in second half of 1984). The body will be blue, and the white part will be dyed grey... I buy kits to built and ru(i)n them
The following user(s) Liked this: yogi-bear
|
|
Please Log in to join the conversation. |

|
looking good. That catalog page is a great find, and interesting to see the Mitsubishi jeep in red as well
The following user(s) Liked this: silvertriple
|
|
|
Please Log in to join the conversation. |
|
I buy kits to built and ru(i)n them
|
|
Please Log in to join the conversation. |
|
All printed parts that will be used for this build (at the notable exception of the driver, which I'm undecided regarding the use of the scanned driver or the Samurai driver like by Optima House....
I need to get into my Marui Hunter/Galaxy boxes in order to fetch screws and other hardware to complete this set so I can start the build... I buy kits to built and ru(i)n them
The following user(s) Liked this: stingray-63
|
|
Please Log in to join the conversation. |
|
I started the build this morning
First piece is the battery bridge... I'm very happy with the black/grey blueish... This is really promising... Next was front shocks (or more precisely springs). The spring and the shaft are original, the rest is printed and comes from the front suspension cluster... The top of the front "shocks" is supposed to be fixed later... So I removed them to follow the instructions... Then the front train is almost ready to join the chassis... 3 screws and 2 shafts later it looks like this... The pins fixing the the front steering axles are difficult to get into, but at the end we have a front train complete (just missing steering rods)... You may note the pivot balls are mounted on the bottom side while the manual says upper side : that allows to reduce bumpster effect... Next is the bumper... I buy kits to built and ru(i)n them
The following user(s) Liked this: yogi-bear
|
|
Please Log in to join the conversation. |
|
The diff is in place... This is my own diff, not the original one. The original one would be usable as well.
Then I close the bottom face of the gearbox... And forgot to take a picture Next was the idle gear. I have the custom diff, so this is custom idle gear. It requires 2 ball bearings 3x8x4. And that was difficult. First, in the bearing pack there was a bearing that was not supposed to be in this pack but in another (4x8x3). I press fitted it and notice the mistake after. At this stage I did not found a way to remove it yet. I had another idle gear, so I decided to use it and to sort the issue of the bearing in the first idle gear later. But it did not went as per plan. Yes, what you see is a broken bearing. the bearing went sideways and the pin I used to press fit it was not large enough to take both rings. It was easy to remove and I did not make the same mistake for the replacement. Next, the idle shaft required a bit of shaving. It's actually 3.175 mm like a motor shaft. I used sand paper while having the shaft turning thanks to my dremel. The motor was quickly mounted once the idle gear was in place. I decided two things. First was to redesign the motor support, and second to put a more powerfull motor. And here we are. Next was to close the gearbox and put the motor cover with the air vent... I could not resist to put the roll cage on as well the body to see the result... The roll cage and body are not fixed yet. I will need to take car of the rear shock first (it will be a Hunter Monoshock, actually) And the monoshock will require the other roll cage... But this will be for one of the next post (which means not today) I buy kits to built and ru(i)n them
The following user(s) Liked this: yogi-bear, stingray-63
|
|
Please Log in to join the conversation. |
|
I already mentioned in this thread, but the Racing Buggy had 4 springs, and not the mono shock like the Hunter...
And while some of the components were in the Nylon reinforced parts cluster, the number for the tubes was present but not the parts... I did estimate how long they would be based on the front ones and the rear suspension range, and got my cluster printed. And while I had shafts for the front from a wrecked car, it was not the case for the rear. The head of that screw is unusually small. I had to do something... The drill and a file and this is done. And we have now the setup... I found some 30 mm spring. In an ideal situation the spring should be just a bit shorter (27mm). I couldn't find the right dimensions. As a result it's not perfect, and I'll have to rely on the monoshock... And that means using the other roll cage (I think now I will have to build another Racing Buggy... at some point The wing was installed on the roll cage. I may want to add few millimeters on each side to the wing (TPU printed). I've not decided yet for the driver figure - here it is a Samurai driver by The Optima House... Remains to do : - reviewed wing print - electronics installation - leds installation (just because) - wheels (tire and rims prints) - paint job and stickers I'm already very happy with how it looks... I buy kits to built and ru(i)n them
The following user(s) Liked this: yogi-bear, stingray-63
|
|
Please Log in to join the conversation. |
|
Servo, ESC and RX (within the receiver box) are installed...
Last thing I will need to do on the radio box lid is to drill a hole to fix the driver figure. I mentioned I wanted to install leds. For the front, I will use some custom led buckets using the original Hunter design, but with some internals redesign so I can install a led inside... Front part was printed in Transluscent ABS, while rear part was printed in black ABS... As usual on this type of setup, I installed a connector for the front leds as the front leds will remain attached to the bodyshell. I still have to print the reviewed wing, and for the paint job, I applied the primer on the bodyshell already... I buy kits to built and ru(i)n them
The following user(s) Liked this: yogi-bear
|
|
Please Log in to join the conversation. |
|
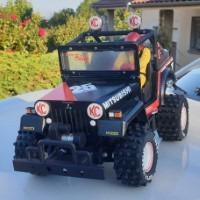
Lot of work during the week for the office, it took a bit more time than expected to get the car finished... I derived a bit from the real one you could see on one picture as I implemented a Hunter monoshock, the Samurai driver (from The Optima House) and the leds/number plate holder. But beside this, I've tried to respect the spirit of the prototype, with Tamiya 380 Sport Tuned motor hidden under the motor cover (with an air scoop to cool the motor) and the fake exhaust on the rear cover...
The blue color and yellow number pannels were derived from the same picture in color taken from another publication (likely a early 1984 catalog while the Hunter was not yet Hunter and was only called Racing Buggy)... I buy kits to built and ru(i)n them
The following user(s) Liked this: yogi-bear, stingray-63
|
|
Please Log in to join the conversation. |

