Keyword

TOPIC:

Richard`s Hornet Speedrun build. 1 year 4 months ago #80537

  • caprinut
  • caprinut's Avatar Topic Author
  • Away
  • Moderator
  • Moderator
  • Posts: 2802
  • Likes received: 4693
Poor Boys RC Youtube channel is holding a speedrun contest this summer and this years chassis is Hornet.
End of July is the timelimit to send in your top speed proof via Youtube video.

More info can be found here: 


Due my bad ME illness atm, and I`m crazy constant dizzyness (possible BPPV), I`m not sure I will get it done before the deadline. But I*ll try...

Since I have lots of Hornet spares this fits me very well. And I like cheap cars going fast 

And since Hornet is 251wb, and the Zakspeed Capri body is 251wb as well, you can guess where this is going 

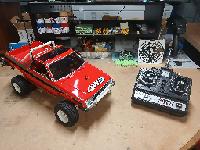
This is my start...


Since repro Tamiya body is allowed, I`m using L&L Models Team C body which is a direct copy of the Tamiya body.
Ant Team C has supplied the wrong wheelbase measurement, it is not 258 as stated, but 251mm as the Tamiya one.
I even measured it..


There is 3 classes for the speedrun.
#1 Brushed motor and 2s max.
#2 Brushless motor and 3s max
Both classes has to use orginal Hornet chasssis and rear axle. No cut allowed, minor shaving allowed.
And only over the counter parts are allowed, no homemade parts, like adjustable motor mount..
#3 Wild class. Anything goes.

I have used a online top speed calculator and from the parts I have I will attend the brushless class.
My plan is 9000kv motor, 2s 4900mAh 120c battery and 65mm tires which will give me top speed of 116kmh.
Need to by the 9000kv motor and servo, wheels and tires, motor cooling fan, new gears and some bits and bobs.
But most other things I have.

And I need to either borrow or buy a gps speed meter of some sort. That`100 quid all day long..

 
The following user(s) Liked this: stingray-63, Al, 1972 LeMansGT Jim, Scanox, Ducksnuts

Please Log in to join the conversation.

Richard`s Hornet Speedrun build. 1 year 4 months ago #80539

I love your project. And am fan of your front wheeles 

Please Log in to join the conversation.

Richard`s Hornet Speedrun build. 1 year 4 months ago #80554

  • caprinut
  • caprinut's Avatar Topic Author
  • Away
  • Moderator
  • Moderator
  • Posts: 2802
  • Likes received: 4693
Thank you Flo!


Next I fitted axle shafts and diff so the rear wheels could be properly mounted.
Before I just had a long threaded pipes and a bunch of bearings acting as spacers...


Also fitted same wheels as rear up front. They are all wrong for this build as the foul the steering knuckle and don`t rotate.
I plan on using formula F104 wheels and tires.


Also test fitted 3s 2200mAh battery which fits with plenty of space to spare.
I don`t own bigger 3s batteries, and to get proper speed out of the 5400kv 13.5turn brushless motor I need a bigger 3s battery.
Also only own crawler elewctric speed controllers which will take 3s battery. I do own a brand new 2s esc, I might swap that for 3s esc if somebody has a spare one. Don`t fancy to spend 100 quid on a esc right now..


I will use these threaded tubes to mount the body. Here the rear ones


Front ones


I plan to mount a flat sheet of 2mm aluminium under the tub chassis, this will also be part of the rear diffuser and support for the front bumper.
As it will extend out to the body, I could also strap one extra battery on each side of the tub for more power. I`m not allowed to use more then 3s power (11.1v), but there is not a limit of the mAh, so I can connect 3x batteries in parallel if I want to. Space is the limiting factor.

And the lowest turn motor I own in brushed version is 12 turn, and with brushed motor I*m limited to 2s power (7.4v which is 8.4v fully charged.
The Horned gearbox is usin 18t pinion, so unless I find a adjustable motor mound I can`t go bigger on the pinion.

My personal goal is 60mph+ in both classes.
Record so far on the web for 12turn brushed motor on 2s is 28.5mph
Not found what 4500kv brushless on 3s battery can do..
Gearing is the biggest issue with this chassis.


Found a online speed calculator yesterday and speed is promissing regarding my 60 mph goal!

On 2s battery, 40.000rpm brushed motor and 65mm tires, top speed is estimated to 46mph, which won`cut it.
On 2s battery, 9000kv motor and 65mm tires, top speed is estimated to 116.4kmh, aka 72mph.

So the latter will be my setup, only need to buy a 9000kv motor which my local hobby shop has in stock atm, and I already has a 2s capable speed controller.
I do have 4500kv motor, but is only intended to be used with 2s battery. That would give me top speed of 36mph...
Same motor on 3s battery will do 54mph. Then I have to buy new speed controller which cost more than the 9000kv.
So 9000kv motor it is then!!!

Kv stand for rpm pr volt, so 9000rpm x 8.4v (fully charged 2s aka 7.4v battery) will give 75600rpm.
Since I can`t change gear ratio easily, high kv motor is the easy way to get speed.
Might buy a new battery which has more ophhhh than my current ones.


Then I made the body mounts.
Front ones had to be shortned about 8mm, redrilled and tapped with M3 as the threads was not long enough.


Fitted


Have tested a few tires fitment today.
Rear got the wide 30mm that is supplied in the TT02 kit. Fits perfectly with use of normal 5mm wide 12mm wheelhex.
Front got foam tires from my unused F103 chassis.


Front tires has a bit naughty poke out of the wings, I need to trim these if I`m going to run these.


With the black rear wheels I used these 19mm wide wheelhexes. So with offset wheels and different thickness of wheelhexes you can make nearly all wheels fit. Front not so much..


With the 2 piece gold wheels set to deep dish and using 5mm normal wheelhex drilled all the way through with 5mm drill bit, these wheels fit perfect!


Current status with body off



The following user(s) Liked this: stingray-63, Al, 1972 LeMansGT Jim

Please Log in to join the conversation.

Richard`s Hornet Speedrun build. 1 year 4 months ago #80555

  • caprinut
  • caprinut's Avatar Topic Author
  • Away
  • Moderator
  • Moderator
  • Posts: 2802
  • Likes received: 4693
Next I fitted the steering. Just mockup for now as I`m going to use a different servo.

I used a servo I had laying aroud, tapped the steering arms for M2, and was to lucky to find 4x 5mm balls with 2mm shaft which fits both steering arms and servo horn. Rod ends I used normal Tamiya 5mm ball connector as they call them.
For the rods I used 3mm allthread which I will sleeve with 4x3mm tube when finished to strengten them.


Due to the front suspension arms is now flipped up side down to get it low enough without silly camber, the steering rods now foul on the steering arms as the arms has a strengthen ribs to the tubes that used to be the underside.
Some minor sanding with a Dremel will fix that.


The servo saver will be glued up as you don`t want a sloppy 80s design going down the road at 70mph.
I have a box full of Tamiya servo savers, so no harm done.

A mate of me will donate a servo and a motor for the cause so I don`t have to spend too much.
I will also borrow a speed controller and a speed meter from him.
Appreciate his gifts very much.

Today I made the steering work.
First a bit Dremel work on the suspension arms and then fitted 4x3mm tube as sleeve for the 3mm allthread.


Then I cut the body and narrowed the front tires.


Took a bit more than I planned for...


And what a mess!
Used a drill and knife to narrow the tires...
The following user(s) Liked this: stingray-63, Al

Please Log in to join the conversation.

Richard`s Hornet Speedrun build. 1 year 4 months ago #80556

  • caprinut
  • caprinut's Avatar Topic Author
  • Away
  • Moderator
  • Moderator
  • Posts: 2802
  • Likes received: 4693
Thread is now up to date..

Please Log in to join the conversation.

Richard`s Hornet Speedrun build. 1 year 4 months ago #80557

  • caprinut
  • caprinut's Avatar Topic Author
  • Away
  • Moderator
  • Moderator
  • Posts: 2802
  • Likes received: 4693
For this project I`m thinking of not going stock on the colors.
Maybe neon yellow body with neon red front splitter and white livery so it easy to see at speed.

Hope I can find someone who can make some decals for me.

My mate that will donate/lend some parts for this project is ging me a 5.5 turn brushless motor. He will lend me a esc that has Turbo function, but if that does not get me to 70mph, I will buy that 9000kv motor I wrote about earlier.
5.5 turn is about 6000-6400kv depending on motor brand so in theory it should not match that 9000kv motor.
He is also supplying a decent servo. 10kg with metal gear should do it.

I also noticed some slope in the new ball connectors at the servo saver. I might order new 5mm ball screws with 2mm bolt to see if it gets less sloppy.
51000 servo saver is also on my buy list as I want a tight servo saver, the vintage ones do bend too much for the speed i want on this project.


I just used the speed calculator again and on 3s with 9000kv motor on 65mm tires it should in theory do 174.6kph or 108mph.
Holy batman!!
I think at that speed it might get airborn and the motor last about 10 secons since it`s a 3650 motor lol.
But I might try if I get big enough esc.
I suspect the rubber tires also will explode before that.
Somewhere I do have some touring foam tires unused. Might be safer with those...
The following user(s) Liked this: Jonny Retro, stingray-63, 1972 LeMansGT Jim

Please Log in to join the conversation.

Last edit: by caprinut.

Richard`s Hornet Speedrun build. 1 year 4 months ago #80570

  • caprinut
  • caprinut's Avatar Topic Author
  • Away
  • Moderator
  • Moderator
  • Posts: 2802
  • Likes received: 4693
Here the other day I made a template for a under chassis which will be made in 1.5 or 2.0mm aluminium sheet.
Then I read the rules more carefully and I have to wait to install that under chassis as no homemade parts is allowed in that class I`m running in.


So that under chassis plate has to wait till after the challenge is over.
Also I have to redo the steering parts as well due to the homemade parts.
I have measured the allthread bits and luckely found Traxxas turnbuckles in the same length so I will buy those. The rest of the parts are useable.
For anyone wondering, Traxxas 5539 (58mm) and 3644 39mm turnbuckles is the right length for Hornet when using normal Tamiya 5mm rod ends.
Also found the cause to the sloppy rod ends, the Tamiya balls are 4.8mm, not 5mm as the 5mm rod ends, so there is 0.2mm slack. A 3mm O ring under the rod end fixes that. Mine has no slack now.

And today I mockup the rear spoiler, lowered the front body mounts, clearanced the front shock towers and trimmed the front arches to the right dim as I will run tourning car wheels front and back.
Front is very tight so I will run 24mm width wheels instead of normal 26 as pr pictures.


You can spot the clearance holes for the shock towers as body was resting on those before...


Naked...
The aluminium boady posts swapped place front to back as I wanted to body lower and front ones were too long...


Rear ones now consist of vintage Tamiya body post, 28mm M3 threaded pipe, 3mm nut and two 3mm set screws to hold it together..


Front ones are now just vintage Tamiya body post and 3mm flange nut as spacer. A 20mm setscrew bolts these to the chassis.


Can`t do much now as I wait on my payment to shop some parts.
So far this has been a free build.
Not so much later....
Tires are 30 quid or so for 4, servo 20 quid, speed controller 60 quid, turnbuckles 17 quid, paint 30 quid, decals 30 quid, wheelhex with bearings are 20 quid as the convert from the 12mm hex driven wheel to bearinfg fitment.
There is also some small bits,n bobs I need as well..
I save a lot if my mate still comes around with a servo, speed controller and motor. Nearly forgot the motor.. Also the speed meter..
The following user(s) Liked this: stingray-63, 1972 LeMansGT Jim, Ducksnuts

Please Log in to join the conversation.

Richard`s Hornet Speedrun build. 1 year 4 months ago #80580

  • caprinut
  • caprinut's Avatar Topic Author
  • Away
  • Moderator
  • Moderator
  • Posts: 2802
  • Likes received: 4693
As parts has arrived, the build can now continue.
Due fatigue, I will start tomorrow.

This got expensive fast lol


Parts are:
Hotrace 1:10 Touring 32 Shore for asphalt
CNHL 2S 4900mAh 120C battery
Surpass Hobby 3650 9000kv motor
XR-950508 5X8X2.5mm flange bearings for the hex to bearing conversion
Tamiya PS27 Fluorcent Yellow
Tamiya PS20 Fluorcent Red
Tamiya PS1 White
U4124 5X7X0.4mm shims
SER-110431 8x11x01mm shims
Traxxas 3948X 18t 32p hardned steel pinion
Fastrax Motor Fan
HPI-101999 Tire Glue
Tamiya 9335057 Gear Set

The Traxxas 5539 and 3644 turnbuckles was a wrong choice as they are M4.
I will swap them out for TT02B 54539 turnbuckle set as rumors says they fit well.

The Hobbywing 10BL60 esc has been in my storage NIB, finally a fitting project to use it on (don`t own many brushless motors).

I had to test fit the new wheel combo and they fit perfect!
Just hope they don`t explode when I go full throttle!


Also test fitted the battery and it fits perfect, snug, and battery cover goes on without problems.
Just need a bit of foam front and rear.
Motor and esc test fitted as well and there will be plenty of space.
The motor fan has to be modified to fit as the gripping legs is to wide for the rear of the motor.

And while I was at my LHS today, I noticed the main road that goes by, was freshly pawed so I have found my spot for test runs. Nice long straights as well.


With these new tires at 63mm diameter and the current setup with 2s battery and 9000kv motor, the top speed is calculated to be 70mph exact.
That is if the motor will deliver 9000rpm pr volt and the tire stays the same dim. I suspect the tire will grow a tad bigger at that speed.


Oh and I forgot I have these on the way as well from Toomod.


Was not cheap lol.
But should have a sturdy front suspension and some spring action in the back..
The following user(s) Liked this: Jonny Retro, stingray-63, 1972 LeMansGT Jim

Please Log in to join the conversation.

Last edit: by caprinut.

Richard`s Hornet Speedrun build. 1 year 4 months ago #80591

  • caprinut
  • caprinut's Avatar Topic Author
  • Away
  • Moderator
  • Moderator
  • Posts: 2802
  • Likes received: 4693
Major progress today!
First I fitted the new gears and shimmed the axles. One 0.2mm shim each side seems to be perfect, 3 there was a bit drag.
But one thing I did not like about the Super Hornet gears, two things actually.
First the new bearings for the counter gear fits loose, so loose that they fall out when you tip the counter gear. I guess the moulds must getting tired so the tolerances get less acuarate over the years.
Second. The small gears don`t snap into place like the old Hornet gears, as the groove in the diff is open, not grip like as the orginal Hornet gears.
Other than that the gears works smooth.
I might take it apart later and fit a round or two of silver tape around the bearings so they stay put.
Can`t imagne loose fit bearings is good for doing 70 mph down the road..
The 5 diff gears was coated with AW grease to make it LSD ish, the rest incl shafts was coated with cheramic grease it has worked wonders for me all these years.

All the electronic was also fitted.


I tried to keep the wires as tidy as I could
Notice my Radiolink receiver uses two atennas.


To the left my Skyrc gyro and to the right the Radiolink R7FG receiver.


The Hobbywing 10BL60 Brushless esc fits without problem at the rear of the chassis.
I fitted the on/off switch to the inside of the tub to protect it.
As usual, I fit electrical tape to both surfaces before I use double sided tape when I fit electronics. So when time comes to remove things, there is no glue to clean up.
You can also spot the fan for the motor heatsink. I had to space it up from the heatsink as the resistor crossmember is in the way.


9000kv should do it!
Calculated top speed with this setup on 2s is 70mph.


The motor heatsink barely fits. Had to trim off the bottom left screwhole and the lower corner.
I will try pan car style without shocks at first.


63mm touring wheels seems a bit lost on a Hornet axle with 19mm wheelhexes 


1137 grams rtr is not bad. Just missing the body here.


And this is the battery I will run. 2s 4900mAh 120C.
Fits perfect in the Hornet chassis with a bit foam front and rear.
This battery is shorty style with a hight of 25mm which is about max in a Hornet.


For now I will use the Losi B0818 servo that is installed. It`s just a bit weak at 3.24kg @ 6V.
Just waiting on the TT02B turnbuckles to turn up so my steering can be legal again (no homemade stuff in my class)

I also converted the front wheels to bearings while I wait on the hex conversion to show up which can take 2-3 weeks.
Wheel was drilled to 8mm to take a 5x8x2.5 flanged bearing on the outside and the inside got a 5x11x4 bearing with a 20cm of thin tape around it to take up the 12mm hex space as I don`t have 6x11x4 bearings in stick.
Also spaced out the wheel with two 850 bushings on each side.
Not totally happy with front wheels as the dont run true, basicly the bearing hole is not exactly in the center. I need a pillar drill really.
And there is not of 1.9" touring wheels out there that has both dish (good for speed) and bearing fitment.
3d printed stuff is not allowed in my class either so can`t go there..

But boy these tires are sticky!!!!!!
They are ment to run on asphalt with low to medium grip which I think normal traffic roads are.
And these Hotrace wheels has a Shore of 32. Higher shore is used on tracks with better grip, aka less sticky compound.

Really happy with todays progress 


The following user(s) Liked this: 1972 LeMansGT Jim

Please Log in to join the conversation.

Last edit: by caprinut.

Richard`s Hornet Speedrun build. 1 year 4 months ago #80595

Nice progress Richard! Hope she flies!!
The following user(s) Liked this: caprinut

Please Log in to join the conversation.

Moderators: caprinut, stingray-63, AndyAus
Time to create page: 0.209 seconds