Keyword
  • Page:
  • 1
  • 2

TOPIC:

Tag Jet / Robbe Geronimo - Offroad 1/10 1 year 5 months ago #80488

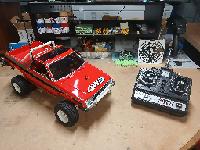
During Montluçonnaise, my friend Benoit put a box with some goodies in my truck. I was aware of the NIB, but did noticed the assembled one only later, and I only check the content once home.


So in short there is a Tag Jet 1/10 NIB and another one, assemble. There is few differences between the two : the NIB has gold anodized chassis parts while the assembled one is not anodized. It may or may not be a Tag Jet, although the decoration of the bodyshell claim it is a Tag Jet. But it could be very well a Robbe Geronimo... One thing missing in the NIB box is the sticker sheet with the colored  grid (I'm 100% sure it was stickers as it is stickers on the assembled one).

The plan will be to model the chassis, repair the broken one to run it (eventually with some improvements), and for the NIB, I'll see later if I'll asemble it or keep it as NIB (this type of NIB screams "Assemble me, please!" :-)
I buy kits to built and ru(i)n them :-)
The following user(s) Liked this: caprinut, stingray-63, 1972 LeMansGT Jim

Please Log in to join the conversation.

Tag Jet / Robbe Geronimo - Offroad 1/10 1 year 5 months ago #80491

Nice gifts.👍

Please Log in to join the conversation.

Tag Jet / Robbe Geronimo - Offroad 1/10 1 year 5 months ago #80498

Nice friend!!

Please Log in to join the conversation.

Tag Jet / Robbe Geronimo - Offroad 1/10 1 year 2 months ago #80888

Time to work this out... I tore down the car this morning... 


There is already a few details screaming overengineering

Some elements even look like it was completely forgotten or overlooked in original design, such as the plate used to fix the rear upper arms... Once in place, the screws that fixes the top gearbox cover are barely accessible, but this part can't be mounted after having installed the top gearbox cover...

Belts are MXL, there is two small for the rear and one big for the front

The diff assembly are made of a common sub-assembly while pulleys differ between front and rear...

Overally, a lot of screws, and I suspect the design to be copy pasted from 1/8 cars for some areas...


And as usual, some stuff mounted incorrectly, and some broken parts...

Anyway, I started to model the diff sub assembly...

One interesting detail (costly one) : there is a hole drilled in the drive cups to hold a spring...

(and yes, I forgot to model the e-clip fixing the bevel gears on the drive cups)

Anyway, that's the beginning...
I buy kits to built and ru(i)n them :-)
The following user(s) Liked this: caprinut, Scanox, BlacqueJacque

Please Log in to join the conversation.

Tag Jet / Robbe Geronimo - Offroad 1/10 1 year 2 months ago #80892

Rear diff complete... The pulley is made of two identical parts fixed together with the diff sub-assembly with 6 screws (3 different sizes)... The diff can't be filled with oil as it is not watertight. Only grease can be used.


For the front the principle is the same with thinner pulley...


The two diffs together...


What is left for internal transmission is the center pulley and the spur gear...


I will need to add the belts at some point, but otherwise, you have the full internal transmission parts of this car
I buy kits to built and ru(i)n them :-)
The following user(s) Liked this: caprinut

Please Log in to join the conversation.

Tag Jet / Robbe Geronimo - Offroad 1/10 1 year 2 months ago #80917

Front and rear wheels were done quickly... Not very difficult. I have already seen those rims on some other cars, not from TAG, SG or Robbe... PB?


Then it was time to deal with the rear Gearbox...
I started to model the motor side, then derive the other side from it. The plastic parts are also derived from the metal plates. I tested the design of the motor plate to check it was right (a quick print on the A1 mini)


The belt tension is managed with excentric : the bearing cages for the diff are not centered in the parts which aacts as excentric...
I buy kits to built and ru(i)n them :-)

Please Log in to join the conversation.

Tag Jet / Robbe Geronimo - Offroad 1/10 1 year 2 months ago #80940

I modeled the front gearbox last night... Not much complexity for this one...


The front belt tension is managed with slots on the front shock tower setting the position of the gearbox on the chassis...

On both front and rear gearbox, I had one parameter left to be defined : the slope of the top deck. I did set it after I got the top deck done as the length between the holes was required to define the slope angle. Once that was done, it was easy to define the bottom chassis plate (which is generally too long to measure précisely, so you need actually the top elements to derive the full length of the chassis (note for CAD starters : measure and model what is easy first, and figure out from other parts what you can't measure precisely).
I buy kits to built and ru(i)n them :-)

Please Log in to join the conversation.

Tag Jet / Robbe Geronimo - Offroad 1/10 1 year 2 months ago #80941

Had to work out some stuff this afternoon, and as a result did not progress much on the CAD model...
Just enough to add a few parts... Battery holders and belt covers.


I also added the bumper


on the central are, there is still missing :
- body posts
- steering servo supports
- steering mechanism
- RX support
Those are mostly small part and easy to model, so it should not be really long, but as they are a bit simple, it's motivation which is lacking now :-)

Then it will be time to work out the suspension arms and the hubs...
I buy kits to built and ru(i)n them :-)
The following user(s) Liked this: larbut

Please Log in to join the conversation.

Tag Jet / Robbe Geronimo - Offroad 1/10 1 year 2 months ago #80942

Few additions yesterday after my previous post...


Then it is time to work out the suspension parts...
And we start by the bottom arms... They are a bit complex, and require to work in boolean (but by far not the most complex I worked on)...

I added all joints before adding the arms to the chassis... You may note that all ends are managed with pivot balls... Certainly more weight, but precision may gain of this.


Next, it was time to deal with the upper arms. They are broken in two halves, with a rod to join them, allowing to set properly the camber. One set is marked with a R, while the other one is set with a F. And that's where the fun begins. I suspect a particular sense of humor of the original designer, as the F set goes at the Rear while the R set goes at the Front. And until I opened the manual of the Jet and the one of the Robbe Geronimo, I could think it was a mistake from the original builder... Anyway, for this car R is for Front and F for Rear...


I buy kits to built and ru(i)n them :-)
The following user(s) Liked this: 1972 LeMansGT Jim

Please Log in to join the conversation.

Tag Jet / Robbe Geronimo - Offroad 1/10 1 year 2 months ago #80949

Next came the hubs...


And then comes the time where it's getting confused... I added the joint at the front (two points, that is easy and that works easily). When it comes to the rear (con)fusion 360 started to disagree with the design...


A double wishbone is a nice idea to get the car guided correctly... But on the other hand, when there is 3 points of attachement on the hub, they need to line up...
Well... They were not so that did not help...

I corrected this putting this one measure issue (difference so small it is fairly possible that my upper wishbone was wrong).


This i not perfect : while the wishbone is made in 2 halves joined by a threaded rod, there is only one single position where the top point is in the proper place, due to the angle the threaded rod is in. I understand why it was put this way : to part the effort to the two points. However, that makes the camber adjustment useless, and a car relying on the flexibility of the said wishbones to work...
It would probably work better with a single attachement point on chassis side, although it is not squared angle, it would be close enough so it should work, and may work even better than the 3 point attachements...


Anyway, the conclusion is that car is certainly over engineered...
I buy kits to built and ru(i)n them :-)

Please Log in to join the conversation.

  • Page:
  • 1
  • 2
Moderators: caprinut, stingray-63, AndyAus
Time to create page: 0.157 seconds