Keyword

TOPIC:

Going oldschool, my vintage CAD 13 years 7 months ago #19326

I'm back :evil:

BB6

Please Log in to join the conversation.

Going oldschool, my vintage CAD 13 years 7 months ago #19329

Er, I don't know, is SD4 not needed then?
Kinda relying on you lot to tell me what you want.... (I don't have a clue about these cars & what is/isn't required)

Yep, add dimensions for J12 & I'll include it (In ally).

Yep, naughty Waterbok, clearing off on hols & leaving us to struggle!

Please Log in to join the conversation.

Going oldschool, my vintage CAD 13 years 7 months ago #19332

SD4 wouldn't be necessary but I'll give you the dimensions in case you want to fabricate an exact repro bag at some point...
J12 would be an awesome addition for anyone building a chassis like this.

B)

Please Log in to join the conversation.

Going oldschool, my vintage CAD 13 years 7 months ago #19335

Ok.
Can I have a simple list with reference numbers of exactly what the most useful kit needs to be please? Kinda getting swamped & unsure what bits to do & what not to do.
The kit should be of all the bits needed to do the job without having to get "some from here some from there" etc.
If there's a definate split between "bits for doing this one" & bits for doing that one", then do a list for each version of car conversion.

eg
"Parts list for Top Force conversion"
??-off SD5
??-off SD6
??-off BB6
etc
etc

"Parts for Monkey-hammer conversion"
??-off SD5
??-off SD6
??-off J12
etc
etc

so I can see what I'm supposed to be doing, without having to learn all about the various cars & mod types

Please Log in to join the conversation.

Going oldschool, my vintage CAD 13 years 7 months ago #19338

Most needed (and sought after) are SD1, SD5 and SD6.
They are unique for the DF-01 and cannot be sourced with a separate parts number.

All the other bits would be very useful for the larger process but are not necessary to put the chassis together - and it should be possible to get them seperately if one decides to go through the further upgrades that naturally offer themselves.

J12 is also not necessary but it's a great hop up over the plastic bit and can be fitted at the same point in the build.
It's also in the Avante parts bag but you have to spent quite a few bucks for that - along with a bunch of parts you don't need...
I can't imagine anyone not wanting to replace that part (especially while they're at it).

Summarizing (as a potential customer) : 2xSD1, 2xSD5, 2xSD6 and 1xJ12.

As a hobbyist I'm interested in all kinds of other bits you could crank out of course.
Like the posts to do a saddle pack setup.
But that would serve a smaller audience...

Please Log in to join the conversation.

Going oldschool, my vintage CAD 13 years 7 months ago #19341

Some may not realise J12's upgradeability and will be looking for the chassis stays (SD5-SD6) and steering mounts (SD1) only. So that would be the most common "bottleneck" in the build process. I'd prefer the bag with optional J12 myself though.

:)

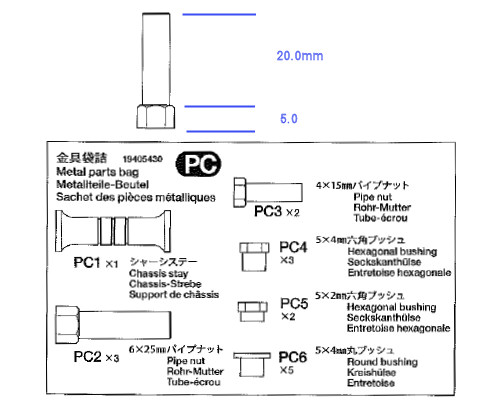
Width of the hex side to side : 6.95mm
Diameter of the top section : 5.95mm


From the Avante parts bag - called PC2 there...

How exact will the fabrication tolerance be?
The total length is 20.02-20.03 25.02-25.03 but that could well be the offset I create with sliding the caliper itself...
Attachments:

Please Log in to join the conversation.

Last edit: by Edou.

Going oldschool, my vintage CAD 13 years 7 months ago #19342

Here's an idea with some search terms if you wanna put 'em on eBay or something (or maybe people ending up in this topic) :

Top Force custom mount bag (like Tamiya #9405710) for DF-01, Manta Ray, Terra Conqueror and Evo FRP or carbon chassis.

Possibly also include : Dirt Thrasher and/or Blazing Star.

With aluminium J12 upgrade...

:silly:

Please Log in to join the conversation.

Going oldschool, my vintage CAD 13 years 7 months ago #19343

Wb, assembly on carbon isn't different in any way, right? :whistle:
Easier to ask you than go through the manual.

Lazy...

Please Log in to join the conversation.

Going oldschool, my vintage CAD 13 years 7 months ago #19344

Hey, that was my 4000th post. :blink:

The 4-5 sets that were on TC went very quickly... :huh:
Might be good timing I recently got the new plates.

Please Log in to join the conversation.

Last edit: by Edou.

Going oldschool, my vintage CAD 13 years 7 months ago #19346

J12 - Earlier assembly drawing & WB's sketch both show a smaller diameter section at the top of J12 - is this needed? Does it have to fit into anything? (eg bearings, mouldings etc). If so, dimensions please, ta
I take it J12 is threaded M3 through?

Machining tolerances - Normal every day stuff that doesn't matter, to the nearest 0.1mm is generally the accepted number, but I usually aim to get better than that when doing stuff for other people.
Where stuff has to fit with other stuff, depending what the "other stuff" is, the machining will be done to between +/-0.05 & smack on.
eg, if the component has to have 5mm I/D bearings fitted, I'll do 4.98 & check it with a 5 I/D bearing.
eg if the component is press-fitted into a 5 I/D plastic hole, I'll do 5.00-5.05
eg if the component is a loose, rotating or sliding fit in a 5 I/D hole, I'll do 4.95-4.98, unless it needs to be sloppy, in which case you'll get 4.90 or less.

As a general rule, at the sizes encountered with toy car stuff, metal-on-metal go/no go fits are 0.02mm. (ie 0.02 interference, 0.00 press-fit, -0.02 bearing hand fitting fit)
This is really the only important tolerancing.

So, using SD1 as an example -
Base diameter can be 8.90-9.10 because it just has to look right (But I'll aim at 9.00)
Main diameter can be 6.90-7.10 because it just has to look right (But I'll aim at 7.00)
Top diameter needs to be 4.95-4.98 because 5.00i/d bearings are fitted by hand & they don't want to be flopping about when they're on.
Length of the lower part can be 10.90-11.10 as overall length isn't critical, just as long as the "pair" are the same within 0.1.
Length of the upper portion IS important - too long & the bearings will flop about, too short & the assembly won't move once the screws are tight. Given that plastic parts are involved too, I'd say this length wants to be 0.05-0.1 oversize (ie 0.05-0.1 clearance, 6.05-6.10).

Don't worry about the fit/tolerancing etc, just make sure I know when there's other stuff the bits have to fit with, & what they are, & I'll sort the tolerancing out


Please Log in to join the conversation.

Moderators: caprinut, stingray-63, AndyAus
Time to create page: 0.158 seconds